# Get Creator Profile Source: https://developers.kit.com/api-reference/accounts/get-creator-profile api-reference/v4.json get /v4/account/creator_profile # Get current account Source: https://developers.kit.com/api-reference/accounts/get-current-account api-reference/v4.json get /v4/account # Get email stats Source: https://developers.kit.com/api-reference/accounts/get-email-stats api-reference/v4.json get /v4/account/email_stats # Get growth stats Source: https://developers.kit.com/api-reference/accounts/get-growth-stats api-reference/v4.json get /v4/account/growth_stats Get growth stats for a specific time period. Defaults to last 90 days.

NOTE: We return your stats in your sending time zone. This endpoint does not return timestamps in UTC. # List colors Source: https://developers.kit.com/api-reference/accounts/list-colors api-reference/v4.json get /v4/account/colors # Update colors Source: https://developers.kit.com/api-reference/accounts/update-colors api-reference/v4.json put /v4/account/colors # API Authentication Source: https://developers.kit.com/api-reference/authentication Authenticating with the Kit API for apps and personal use We support two authentication mechanisms in the V4 API: * **OAuth 2.0** for apps available for all creators in the Kit App Store * **API keys** for automating simple tools and integrations for your own account ## OAuth We support the [Authorization Code Grant](https://datatracker.ietf.org/doc/html/rfc6749#section-4.1) and depending on the type of app you're building we support two ways of issuing access tokens: * For web servers, you'll use the [refresh token flow](/api-reference/oauth-refresh-token-flow) * For Single Page Apps (SPA) or mobile apps, you'll use the [Proof Key for Code Exchange (PKCE) flow](/api-reference/oauth-proof-key-for-code-exchange-flow) OAuth app flow We've found these two resources to be helpful for learning more about how OAuth 2.0 works: ### Creating and configuring your OAuth powered app For apps and full API V4 support, you will need to authenticate via OAuth 2.0. In order to set this up in your Kit account, first you have to [create an app](/kit-app-store/building-apps#creating-your-app) and turn on [API access](/kit-app-store/building-apps#api-and-plugin-access). Once you have turned on API authentication for your app you will be offered 3 settings to configure: * `Authorization URL` * `Redirect URIs` * `Secure application` OAuth configuration ##### Authorization URL The `Authorization URL` should be a URL on your system that we will link to during app installation so you can initiate OAuth and store the returned access tokens. We will link the user to this URL with a `redirect` query param, e.g. `?redirect=https://app.kit.com/apps`. When the authorization flow is complete, you need to redirect the user back to that provided redirect URL so they can continue their session within the Kit app. ##### Redirect URI(s) Once a user has logged in or signed up with your service, you will redirect them back to the Kit OAuth server for the creator to grant access to the Kit API for your service. On this request you will specify the callback URI that Kit will reach out to with a temporary authorization code, that you will be able to exchange for an access and refresh token, once consent is given by the user. For security, the value in the `redirect_uri` property sent to the Kit OAuth server must match one of the Redirect URIs you have set up in the above app configuration screen. ##### Secure application If your app will be used in an insecure location where the client secret can't be kept confidential - such as mobile or single page apps, you will have to turn this setting off. When unchecked this will enforce use of the [Proof Key for Code Exchange (PKCE) flow found above](/api-reference/authentication#oauth-flows). ##### Post-installation redirect Your app may also include the option to alternatively send creators to your app, or an externally hosted onboarding flow, post signup. This can be configured using the `Redirect URL after install` field in your [app details setting page](/kit-app-store/app-details-page). An example of this flow can be seen below. example redirect flow example redirect flow ## API keys API key authentication is the simplest way to access V4 of the API, tailored for programmatic access to your own Kit account for simple account automation, or for pulling account data for deeper external analysis. We do not offer any official support for apps or public integrations that rely upon API keys for authentication - for apps, please follow the OAuth guide below. We also offer some restrictions when using API keys: * When using API Keys, no more than 120 requests over a rolling 60 second period for a given API Key (we offer limits of 600 requests using OAuth) * Some of our endpoints require OAuth authentication - for example, our bulk and purchase creation endpoints. Please check the endpoint specific documentation for authentication requirements ### Creating V4 API keys To use API Key authentication, you must first create a V4 API Key. To do this, visit the ["Developer" tab in your account settings](https://app.kit.com/account_settings/developer_settings). v4 api key settings Here: Please make sure to save your API key at this point and keep it somewhere safe, as you'll not be able to access it again after leaving the screen. V4 api key created ### Resetting & deleting V4 API keys If you have misplaced your API key, you will not be able to retrieve it again and will instead have to reset it from within your ["Developer" settings](https://app.kit.com/account_settings/developer_settings). To reset your key, first click on the "Edit" button on the key you want to update: edit v4 api key Then click on the "Reset" button to re-roll the key to a new value. reset v4 api key Click "Reset" once more to confirm your action. reset v4 api key confirmation Your V4 key is now reset. At this point, any script or process that was relying on the previous iteration of the key will fail to authenticate, so you will need to replace it with the new value provided here. Again, it is important that you save your API key at this point and keep it somewhere safe, as you'll not be able to access it again after leaving the screen. v4 api key reset ### Deleting V4 API keys If you ever no longer need an API Key, you can also delete it by editing the API Key, and click on "Delete API Key". delete v4 api key ### Using V4 API keys To use V4 API key authentication, pass the key alongside a `X-Kit-Api-Key` header when making requests. For example, the following request will return your account information: ```shell theme={null} curl --request GET \ --url https://api.kit.com/v4/account \ --header 'X-Kit-Api-Key: ' ``` # Create a broadcast Source: https://developers.kit.com/api-reference/broadcasts/create-a-broadcast api-reference/v4.json post /v4/broadcasts Draft or schedule to send a broadcast to all or a subset of your subscribers.

To save a draft, set `send_at` to `null`.

To publish to the web, set `public` to `true`.

To schedule the broadcast for sending, provide a `send_at` timestamp. Scheduled broadcasts should contain a subject and your content, at a minimum.

We currently support targeting your subscribers based on segment or tag ids. # Delete a broadcast Source: https://developers.kit.com/api-reference/broadcasts/delete-a-broadcast api-reference/v4.json delete /v4/broadcasts/{id} # Get a broadcast Source: https://developers.kit.com/api-reference/broadcasts/get-a-broadcast api-reference/v4.json get /v4/broadcasts/{id} # Get link clicks for a broadcast Source: https://developers.kit.com/api-reference/broadcasts/get-link-clicks-for-a-broadcast api-reference/v4.json get /v4/broadcasts/{broadcast_id}/clicks NOTE: Pagination parameters control the list of clicks for the top level broadcast. # Get stats for a broadcast Source: https://developers.kit.com/api-reference/broadcasts/get-stats-for-a-broadcast api-reference/v4.json get /v4/broadcasts/{broadcast_id}/stats # Get stats for a list of broadcasts Source: https://developers.kit.com/api-reference/broadcasts/get-stats-for-a-list-of-broadcasts api-reference/v4.json get /v4/broadcasts/stats # List broadcasts Source: https://developers.kit.com/api-reference/broadcasts/list-broadcasts api-reference/v4.json get /v4/broadcasts # Update a broadcast Source: https://developers.kit.com/api-reference/broadcasts/update-a-broadcast api-reference/v4.json put /v4/broadcasts/{id} Update an existing broadcast. Continue to draft or schedule to send a broadcast to all or a subset of your subscribers.

To save a draft, set `public` to false.

To schedule the broadcast for sending, set `public` to true and provide `send_at`. Scheduled broadcasts should contain a subject and your content, at a minimum.

We currently support targeting your subscribers based on segment or tag ids. # Bulk & async processing Source: https://developers.kit.com/api-reference/bulk-and-async-processing Working with our bulk endpoints We support bulk processing for some common use cases, e.g. create subscribers, requiring OAuth authentication. These endpoints exist in the bulk namespace, i.e. `https://api.kit.com/v4/bulk/`. In our bulk requests, we support synchronous processing for small batch sizes. The cut off size is clearly documented in each bulk request's documentation below. For large batch sizes, we use an asynchronous callback design. If you include a `callback_url` in your request body, we’ll `POST` to that URL when our processing has completed. Our `POST` request body will be the same response shape as our documented our synchronous `200 OK` use case for each endpoint. If you try to enqueue too many bulk requests at once, you'll receive an error response with a `413` status code, which your code should gracefully handle. Try again after a short period. We can receive up to 300MB of request data per app, per creator account, before we respond with a `413` status. This is shared across all bulk requests (e.g. bulk creation of subscribers and tags). # Bulk create custom fields Source: https://developers.kit.com/api-reference/custom-fields/bulk-create-custom-fields api-reference/v4.json post /v4/bulk/custom_fields See "[Bulk & async processing](#bulk-amp-async-processing)" for more information. # Bulk update subscriber custom field values Source: https://developers.kit.com/api-reference/custom-fields/bulk-update-subscriber-custom-field-values api-reference/v4.json post /v4/bulk/custom_fields/subscribers # Create a custom field Source: https://developers.kit.com/api-reference/custom-fields/create-a-custom-field api-reference/v4.json post /v4/custom_fields Create a custom field for your account. The label field must be unique to your account. Whitespace will be removed from the beginning and the end of your label.

Additionally, a key field and a name field will be generated for you. The key is an ASCII-only, lowercased, underscored representation of your label. This key must be unique to your account. Keys are used in personalization tags in sequences and broadcasts. Names are unique identifiers for use in the HTML of custom forms. They are made up of a combination of ID and the key of the custom field prefixed with "ck_field". # Delete custom field Source: https://developers.kit.com/api-reference/custom-fields/delete-custom-field api-reference/v4.json delete /v4/custom_fields/{id} This will remove all data in this field from your subscribers. # List custom fields Source: https://developers.kit.com/api-reference/custom-fields/list-custom-fields api-reference/v4.json get /v4/custom_fields A custom field allows you to collect subscriber information beyond the standard fields of first name and email address. An example would be a custom field called last name so you can get the full names of your subscribers.

You create a custom field, and then you're able to use that in your forms or emails. # Update a custom field Source: https://developers.kit.com/api-reference/custom-fields/update-a-custom-field api-reference/v4.json put /v4/custom_fields/{id} Updates a custom field label (see [Create a custom field](#create-a-custom-field) above for more information on labels). Note that the key will change but the name remains the same when the label is updated.

Warning: An update to a custom field will break all of the liquid personalization tags in emails that reference it - e.g. if you update a `Zip_Code` custom field to `Post_Code`, all liquid tags referencing `{{ subscriber.Zip_Code }}` would no longer work and need to be replaced with `{{ subscriber.Post_Code }}`. # Dates Source: https://developers.kit.com/api-reference/dates Working with dates We return date values throughout our API. These are all returned in UTC, ISO8601 format such as: `"2023-07-17T16:48:20Z"`. In order to make this data more user friendly, we recommend using the `timezone.utc_offset` found on the [Get current account endpoint](/api-reference/accounts/get-current-account) to convert the date to the timezone set on the Kit account level of the creator. # Add subscriber to form Source: https://developers.kit.com/api-reference/forms/add-subscriber-to-form api-reference/v4.json post /v4/forms/{form_id}/subscribers/{id} The subscriber being added to the form must already exist. Subscribers can be created using the "[Create a subscriber](#create-a-subscriber)" endpoint. # Add subscriber to form by email address Source: https://developers.kit.com/api-reference/forms/add-subscriber-to-form-by-email-address api-reference/v4.json post /v4/forms/{form_id}/subscribers The subscriber being added to the form must already exist. Subscribers can be created using the "[Create a subscriber](#create-a-subscriber)" endpoint. # Bulk add subscribers to forms Source: https://developers.kit.com/api-reference/forms/bulk-add-subscribers-to-forms api-reference/v4.json post /v4/bulk/forms/subscribers Adding subscribers to double opt-in forms will trigger sending an Incentive Email. Subscribers already added to the specified form will not receive the Incentive Email again. For more information about double opt-in see "[Double opt-in](#double-opt-in)".

The subscribers being added to the form must already exist. Subscribers can be created in bulk using the "[Bulk create subscriber](#bulk-create-subscribers)" endpoint.

See "[Bulk & async processing](#bulk-amp-async-processing)" for more information. # List forms Source: https://developers.kit.com/api-reference/forms/list-forms api-reference/v4.json get /v4/forms # List subscribers for a form Source: https://developers.kit.com/api-reference/forms/list-subscribers-for-a-form api-reference/v4.json get /v4/forms/{form_id}/subscribers # Proof Key for Code Exchange (PKCE) flow Source: https://developers.kit.com/api-reference/oauth-proof-key-for-code-exchange-flow This guide will help you understand how to set up a PKCE OAuth flow for your Kit app. For more details on which flow to use or how to set up your OAuth app within Kit, please refer to the [more general "Authentication" guide](/api-reference/authentication). When a user installs your app from the Kit App Store, Kit redirects them to the `Authorization URL` you've configured. ``` https://example.com/kit/oauth?redirect=https://app.kit.com/apps/1?success=true ``` From here, your app should present the user a screen to sign in (or sign up). Kit will append a redirect query parameter to your Authorization URL that you will need to save in order to complete the flow. Before redirecting the user to the authorization server, the app must first generate a secret code verifier and challenge.

The code verifier is a cryptographically random string using the characters A-Z, a-z, 0-9, and the punctuation characters -.\_\~ (hyphen, period, underscore, and tilde), between 43 and 128 characters long.

Once the app has generated the code verifier, it uses that to create the code challenge. The code challenge is a BASE64-URL-encoded string of the SHA256 hash of the code verifier.

The app will need to store the `code_verifier` for later use.

After the user successfully authenticates with your app and the code verifier and challenge have been generated, redirect them to Kit's OAuth server to request their identity. The value supplied to redirect\_uri must be one of the Redirect URIs configured in your app's settings, found on the *Distribution* tab. ```http theme={null} https://api.kit.com/v4/oauth/authorize? client_id=YOUR_CLIENT_ID& response_type=code& redirect_uri=https://oauth2.example.com/callback&code_challenge=N2U2ZjNiNDEzZDE4NzkwYzYyYTM5ZjEwMzM1NDUzY2IwYTNlNWM5ODQ2NWQyNGU5ZTdiMjZiY2E4Njc5ZjY3Zg& code_challenge_method=S256& state=DEF456 ``` Your app's Client ID `code` URI to redirect to A BASE64-URL-encoded string of the SHA256 hash of the code\_verifier `S256` Default scope is `public`. Fine-grained access control via scopes coming soon. Custom state to pass to the `redirect_uri` and/or to protect from XSRF Unique, human-readable identifier for a tenant of a multi-tenant app. Found on the "Authentication" tab in your app settings: Example Kit app configuration Kit will present a consent screen that asks the user to grant or refuse your app access to their account. Kit OAuth page If the user grants access, Kit redirects the user back to the `redirect_uri` you provided when requesting the user's identity in step 2.

Kit appends a `code` query param with a temporary authorization code.

Kit also appends a state query param with the same value sent in the authorization request. This check helps verify that the user, not a malicious script, is making the request and reduces the risk of CSRF attacks. ``` https://oauth2.example.com/callback? code=mrApixZzMPnYO28KoeIZxn2mvom1Tx48S9iyrQVYVE8& state=DEF456 ```
Your app uses the authorization code provided to obtain a refresh and access token. ``` POST https://api.kit.com/v4/oauth/token ``` With a body like so: ```json theme={null} { "client_id": "YOUR_CLIENT_ID", "code_verifier": "add75a87509bca16dead084e7908824c8373cdeeb28341ae44713a6879f47be8f8fe6edfe9b8fa6917535e", "grant_type": "authorization_code", "code": "abc123", "redirect_uri": "https://oauth2.example.com/callback" } ``` Your app's Client ID A cryptographically random string using the characters A-Z, a-z, 0-9, and the punctuation characters -.\_\~ (hyphen, period, underscore, and tilde), between 43 and 128 characters long. `authorization_code` The code received via the redirect uri query params The redirect URI the request is coming from (must be one of your app's redirect URIs) ```shell shell theme={null} curl -X POST https://api.kit.com/v4/oauth/token \ -H 'Content-Type: application/x-www-form-urlencoded' \ -H 'Accept: application/json' \ -d '{ "client_id": "YOUR_CLIENT_ID", "code_verifier": "add75a87509bca16dead084e7908824c8373cdeeb28341ae44713a6879f47be8f8fe6edfe9b8fa6917535e", "grant_type": "authorization_code", "code": "abc123", "redirect_uri": "https://oauth2.example.com/callback" }' ``` ```javascript Javascript theme={null} const headers = { 'Content-Type':'application/x-www-form-urlencoded', 'Accept':'application/json' }; const inputBody = '{ "client_id": "YOUR_CLIENT_ID", "code_verifier": "add75a87509bca16dead084e7908824c8373cdeeb28341ae44713a6879f47be8f8fe6edfe9b8fa6917535e", "grant_type": "authorization_code", "code": "abc123", "redirect_uri": "https://oauth2.example.com/callback" }'; fetch('https://api.kit.com/v4/oauth/token', { method: 'POST', body: inputBody, headers: headers }) .then(function(res) { return res.json(); }).then(function(body) { console.log(body); }); ``` ```ruby Ruby theme={null} require 'rest-client' require 'json' headers = { 'Content-Type' => 'application/x-www-form-urlencoded', 'Accept' => 'application/json' } payload = { "client_id" => "YOUR_CLIENT_ID", "code_verifier" => "add75a87509bca16dead084e7908824c8373cdeeb28341ae44713a6879f47be8f8fe6edfe9b8fa6917535e", "grant_type" => "authorization_code", "code" => "abc123", "redirect_uri" => "https://oauth2.example.com/callback" } result = RestClient.post 'https://api.kit.com/v4/oauth/token', payload, params: { }, headers: headers p JSON.parse(result) ``` ```python Python theme={null} import requests headers = { 'Content-Type': 'application/x-www-form-urlencoded', 'Accept': 'application/json' } json = { "client_id": "YOUR_CLIENT_ID", "code_verifier": "add75a87509bca16dead084e7908824c8373cdeeb28341ae44713a6879f47be8f8fe6edfe9b8fa6917535e", "grant_type": "authorization_code", "code": "abc123", "redirect_uri": "https://oauth2.example.com/callback" } r = requests.post('https://api.kit.com/v4/oauth/token', headers = headers, json = json) print(r.json()) ``` **200**: Returns a token ```json theme={null} { "access_token": "YOUR_ACCESS_TOKEN_HERE", "token_type": "Bearer", "expires_in": 172800, "refresh_token": "YOUR_REFRESH_TOKEN_HERE", "scope": "public", "created_at": 1710270147 } ```

Response schema: *application/json*

Access token that can be used to make API requests on behalf of the authenticated user `Bearer` When the access token expire in seconds Refresh token that can be used to generate a new access token once this one expires The scopes available for the access token When the access token was created
Now that the user has completed the OAuth flow, your app must send the the user back to Kit using the `redirect` parameter provided at the beginning of the flow.

This will ensure the user properly navigates back to your app inside of Kit and registers that the app has been installed.

If you have set up the `Redirect URL after install` field in your app's settings, a modal prompting creators to continue their journey on your configured site will appear at this point. See this section in the [app details page guide](/kit-app-store/app-details-page#how-to-configure) for more details. example redirect flow
Your app can now make calls to Kit's API on behalf of the user by passing a `Authorization` header with the token as a `Bearer` value. ```shell shell theme={null} curl -X GET https://api.kit.com/v4/account \ -H 'Accept: application/json' \ -H 'Authorization: Bearer YOUR_ACCESS_TOKEN_HERE' ``` ```javascript Javascript theme={null} const headers = { 'Accept':'application/json', 'Authorization':'Bearer YOUR_ACCESS_TOKEN_HERE' }; fetch('https://api.kit.com/v4/account', { method: 'GET', headers: headers }) .then(function(res) { return res.json(); }).then(function(body) { console.log(body); }); ``` ```ruby Ruby theme={null} require 'rest-client' require 'json' headers = { 'Accept' => 'application/json', 'Authorization' => 'Bearer YOUR_ACCESS_TOKEN_HERE' } result = RestClient.get 'https://api.kit.com/v4/account', params: { }, headers: headers p JSON.parse(result) ``` ```python Python theme={null} import requests headers = { 'Accept': 'application/json', 'Authorization': 'Bearer YOUR_ACCESS_TOKEN_HERE' } r = requests.get('https://api.kit.com/v4/account', headers = headers) print(r.json()) ``` The access token will eventually expire and a new one must be obtained using the refresh token obtained earlier. To do this, make a `POST` call to `https://api.kit.com/v4/oauth/token`, with the following body: ```json theme={null} { "client_id": "YOUR_CLIENT_ID", "grant_type": "refresh_token", "refresh_token": "abc123" } ``` Your app's Client ID `refresh_token` The refresh token ```shell shell theme={null} curl -X POST https://api.kit.com/v4/oauth/token \ -H 'Content-Type: application/json' \ -H 'Accept: application/json' \ -d '{ "client_id": "YOUR_CLIENT_ID", "grant_type": "refresh_token", "code": "abc123" }' ``` ```javascript Javascript theme={null} const headers = { 'Content-Type':'application/json', 'Accept':'application/json' }; const inputBody = '{ "client_id": "YOUR_CLIENT_ID", "grant_type": "refresh_token", "code": "abc123" }'; fetch('https://api.kit.com/v4/oauth/token', { method: 'POST', body: inputBody, headers: headers }) .then(function(res) { return res.json(); }).then(function(body) { console.log(body); }); ``` ```ruby Ruby theme={null} require 'rest-client' require 'json' headers = { 'Content-Type' => 'application/json', 'Accept' => 'application/json' } payload = { "client_id" => "YOUR_CLIENT_ID", "grant_type" => "refresh_token", "code" => "abc123" } result = RestClient.post 'https://api.kit.com/v4/oauth/token', payload, params: { }, headers: headers p JSON.parse(result) ``` ```python Python theme={null} import requests headers = { 'Content-Type': 'application/json', 'Accept': 'application/json' } json = { "client_id": "YOUR_CLIENT_ID", "grant_type": "refresh_token", "code": "abc123" } r = requests.post('https://api.kit.com/v4/oauth/token', headers = headers, json = json) print(r.json()) ``` **200**: Returns a token ```json theme={null} { "access_token": "YOUR_NEW_ACCESS_TOKEN_HERE", "token_type": "Bearer", "expires_in": 7200, "refresh_token": "YOUR_NEW_REFRESH_TOKEN_HERE", "scope": "public", "created_at": 1710271006 } ```

Response schema: *application/json*

Access token that can be used to make API requests on behalf of the authenticated user `Bearer` When the access token expire in seconds Refresh token that can be used to generate a new access token once this one expires The scopes available for the access token When the access token was created
# OAuth refresh token flow Source: https://developers.kit.com/api-reference/oauth-refresh-token-flow This guide will help you understand how to set up a standard refresh token flow for an OAuth app. For more details on which flow to use or how to set up your OAuth app within Kit, please refer to the [more general "Authentication" guide](/api-reference/authentication). We also offer example OAuth implementations that can be viewed below: View Oauth2 strategy for Kit on Github See an example of authenticating with [Kit's OAuth Server in Node.js here](https://github.com/Kit/app-demos/tree/17077153aed0fc2475054e267813c2a3f147195e/oauth-express) ## OAuth refresh token flow When a user installs your app from the Kit App Store, Kit redirects them to the `Authorization URL` you've configured. ``` https://example.com/kit/oauth?redirect=https://app.kit.com/apps/1?success=true ``` From here, your app should present the user a screen to sign in (or sign up). Kit will append a redirect query parameter to your Authorization URL that you will need to save in order to complete the flow. After the user successfully authenticates with your app, redirect them to Kit's OAuth server to request their identity. The value supplied to redirect\_uri must be one of the Redirect URIs configured in your app's settings, found on the *Distribution* tab. ```http theme={null} https://api.kit.com/v4/oauth/authorize? client_id=YOUR_CLIENT_ID& response_type=code& redirect_uri=https://oauth2.example.com/callback& state=DEF456 ``` Your app's Client ID `code` URI to redirect to Default scope is `public`. Fine-grained access control via scopes coming soon. Custom state to pass to the `redirect_uri` and/or to protect from XSRF Unique, human-readable identifier for a tenant of a multi-tenant app. Found on the "Authentication" tab in your app settings: Example Kit app configuration Kit will present a consent screen that asks the user to grant or refuse your app access to their account. Kit OAuth page If the user grants access, Kit redirects the user back to the `redirect_uri` you provided when requesting the user's identity in step 2.

Kit appends a `code` query param with a temporary authorization code.

Kit also appends a state query param with the same value sent in the authorization request. This check helps verify that the user, not a malicious script, is making the request and reduces the risk of CSRF attacks. ``` https://oauth2.example.com/callback? code=mrApixZzMPnYO28KoeIZxn2mvom1Tx48S9iyrQVYVE8& state=DEF456 ```
Your app uses the authorization code provided to obtain a refresh and access token. ``` POST https://api.kit.com/v4/oauth/token ``` With a body like so: ```json theme={null} { "client_id": "YOUR_CLIENT_ID", "client_secret": "YOUR_CLIENT_SECRET", "grant_type": "authorization_code", "code": "abc123", "redirect_uri": "https://oauth2.example.com/callback" } ``` Your app's Client ID Your app's Client Secret `authorization_code` The code received via the redirect uri query params The redirect URI the request is coming from (must be one of your app's redirect URIs) ```shell shell theme={null} curl -X POST https://api.kit.com/v4/oauth/token \ -H 'Content-Type: application/json' \ -H 'Accept: application/json' \ -d '{ "client_id": "YOUR_CLIENT_ID", "client_secret": "YOUR_CLIENT_SECRET", "grant_type": "authorization_code", "code": "abc123", "redirect_uri": "https://oauth2.example.com/callback" }' ``` ```javascript Javascript theme={null} const headers = { 'Content-Type':'application/json', 'Accept':'application/json' }; const inputBody = '{ "client_id": "YOUR_CLIENT_ID", "client_secret": "YOUR_CLIENT_SECRET", "grant_type": "authorization_code", "code": "abc123", "redirect_uri": "https://oauth2.example.com/callback" }'; fetch('https://api.kit.com/v4/oauth/token', { method: 'POST', body: inputBody, headers: headers }) .then(function(res) { return res.json(); }).then(function(body) { console.log(body); }); ``` ```ruby Ruby theme={null} require 'rest-client' require 'json' headers = { 'Content-Type' => 'application/json', 'Accept' => 'application/json' } payload = { "client_id" => "YOUR_CLIENT_ID", "client_secret" => "YOUR_CLIENT_SECRET", "grant_type" => "authorization_code", "code" => "abc123", "redirect_uri" => "https://oauth2.example.com/callback" } result = RestClient.post 'https://api.kit.com/v4/oauth/token', payload, params: { }, headers: headers p JSON.parse(result) ``` ```python Python theme={null} import requests headers = { 'Content-Type': 'application/json', 'Accept': 'application/json' } json = { "client_id": "YOUR_CLIENT_ID", "client_secret": "YOUR_CLIENT_SECRET", "grant_type": "authorization_code", "code": "abc123", "redirect_uri": "https://oauth2.example.com/callback" } r = requests.post('https://api.kit.com/v4/oauth/token', headers = headers, json = json) print(r.json()) ``` **200**: Returns a token ```json theme={null} { "access_token": "YOUR_ACCESS_TOKEN_HERE", "token_type": "Bearer", "expires_in": 172800, "refresh_token": "YOUR_REFRESH_TOKEN_HERE", "scope": "public", "created_at": 1710270147 } ```

Response schema: *application/json*

Access token that can be used to make API requests on behalf of the authenticated user `Bearer` When the access token expire in seconds Refresh token that can be used to generate a new access token once this one expires The scopes available for the access token When the access token was created
Now that the user has completed the OAuth flow, your app must send the the user back to Kit using the `redirect` parameter provided at the beginning of the flow.

This will ensure the user properly navigates back to your app inside of Kit and registers that the app has been installed.

If you have set up the `Redirect URL after install` field in your app's settings, a modal prompting creators to continue their journey on your configured site will appear at this point. See this section in the [app details page guide](/kit-app-store/app-details-page#how-to-configure) for more details. example redirect flow
Your app can now make calls to Kit's API on behalf of the user by passing a `Authorization` header with the token as a `Bearer` value. ```shell shell theme={null} curl -X GET https://api.kit.com/v4/account \ -H 'Accept: application/json' \ -H 'Authorization: Bearer YOUR_ACCESS_TOKEN_HERE' ``` ```javascript Javascript theme={null} const headers = { 'Accept':'application/json', 'Authorization':'Bearer YOUR_ACCESS_TOKEN_HERE' }; fetch('https://api.kit.com/v4/account', { method: 'GET', headers: headers }) .then(function(res) { return res.json(); }).then(function(body) { console.log(body); }); ``` ```ruby Ruby theme={null} require 'rest-client' require 'json' headers = { 'Accept' => 'application/json', 'Authorization' => 'Bearer YOUR_ACCESS_TOKEN_HERE' } result = RestClient.get 'https://api.kit.com/v4/account', params: { }, headers: headers p JSON.parse(result) ``` ```python Python theme={null} import requests headers = { 'Accept': 'application/json', 'Authorization': 'Bearer YOUR_ACCESS_TOKEN_HERE' } r = requests.get('https://api.kit.com/v4/account', headers = headers) print(r.json()) ``` The access token will eventually expire and a new one must be obtained using the refresh token obtained earlier. To do this, make a `POST` call to `https://api.kit.com/v4/oauth/token`, with the following body: ```json theme={null} { "client_id": "YOUR_CLIENT_ID", "grant_type": "refresh_token", "refresh_token": "abc123" } ``` Your app's Client ID `refresh_token` The refresh token ```shell shell theme={null} curl -X POST https://api.kit.com/v4/oauth/token \ -H 'Content-Type: application/json' \ -H 'Accept: application/json' \ -d '{ "client_id": "YOUR_CLIENT_ID", "grant_type": "refresh_token", "code": "abc123" }' ``` ```javascript Javascript theme={null} const headers = { 'Content-Type':'application/json', 'Accept':'application/json' }; const inputBody = '{ "client_id": "YOUR_CLIENT_ID", "grant_type": "refresh_token", "code": "abc123" }'; fetch('https://api.kit.com/v4/oauth/token', { method: 'POST', body: inputBody, headers: headers }) .then(function(res) { return res.json(); }).then(function(body) { console.log(body); }); ``` ```ruby Ruby theme={null} require 'rest-client' require 'json' headers = { 'Content-Type' => 'application/json', 'Accept' => 'application/json' } payload = { "client_id" => "YOUR_CLIENT_ID", "grant_type" => "refresh_token", "code" => "abc123" } result = RestClient.post 'https://api.kit.com/v4/oauth/token', payload, params: { }, headers: headers p JSON.parse(result) ``` ```python Python theme={null} import requests headers = { 'Content-Type': 'application/json', 'Accept': 'application/json' } json = { "client_id": "YOUR_CLIENT_ID", "grant_type": "refresh_token", "code": "abc123" } r = requests.post('https://api.kit.com/v4/oauth/token', headers = headers, json = json) print(r.json()) ``` **200**: Returns a token ```json theme={null} { "access_token": "YOUR_NEW_ACCESS_TOKEN_HERE", "token_type": "Bearer", "expires_in": 7200, "refresh_token": "YOUR_NEW_REFRESH_TOKEN_HERE", "scope": "public", "created_at": 1710271006 } ```

Response schema: *application/json*

Access token that can be used to make API requests on behalf of the authenticated user `Bearer` When the access token expire in seconds Refresh token that can be used to generate a new access token once this one expires The scopes available for the access token When the access token was created
# API Overview Source: https://developers.kit.com/api-reference/overview Our API offers a host of functionality to help our creators automate a bunch of tasks to help make their lives as easy as possible and developers build apps for our ever-growing Kit App Store. As long as the authenticated account's plan is [eligible for use with the API, apps and legacy integrations](https://kit.com/pricing), you will be able to create and send broadcasts to your subscribers, manage your email list through tags and custom fields, import purchase data from your favourite e-commerce platforms and much, much more. If you are a third party developer, you can use the Kit API to link together or build on top of the Kit platform. Then, once your app is complete, you will be able to publish it to the thousands of creators using our platform today. ## New to Kit API V4 Kit API V4 introduces many new features and improved functionality from our previous versions such as: * Improved performance * Cursor-based pagination * Bulk requests and async processing * New functionality for broadcasts, including access to subscriber filters and improved HTML support * Better access to subscriber stats * Bug fixes * and much, much more. See our guide on [upgrading from V3 to V4](/api-reference/upgrading-to-v4) for more details. Kit API V4 is the latest version of our API. [API V3](/api-reference/v3/overview) is still available for use but is deprecated and will be sunset in the future. We recommend using API V4 for all new projects. ## Quick Access Learn everything you need to know to build for the Kit App Store. Using V3 of the Kit API? Find out about breaking changes between versions, to get you up and running on V4 in no time. # Pagination Source: https://developers.kit.com/api-reference/pagination Working with paginated responses ```json theme={null} { "broadcasts": [...], "pagination": { "has_previous_page": false, "has_next_page": true, "start_cursor": "WzEzXQ==", "end_cursor": "WzE0XQ==", "per_page": 100 } } ``` All of our list endpoints are paginated unless noted otherwise, using cursor based pagination. Each one will return a `pagination` object in the JSON response, with an example shown on the right. In order to navigate the results, follow these steps: * The default page size is 500 results. To change the page size, use the `per_page` query parameter. The maximum page size allowed is 1000. * To request the next page of results, use the `after` query param with the `end_cursor` value of the response. * To request the previous page of results, use the `before` query param with the `start_cursor` value of the response. * To request the total count of the collection, use the `include_total_count` query param with a value of `true`. This will complete another data query to return the total count. Expect a slightly slower response when using this option. # API response codes Source: https://developers.kit.com/api-reference/response-codes Key response codes you may encounter while using the Kit API ## 401 | Unauthorized We return the Unauthorized error in a variety of situations, including: * the authentication method is configured incorrectly or not included on the call * the incorrect authentication method is used (some endpoints require OAuth) * an account no longer has access to apps (due to their trial lapsing, being on a free account, failed account payment etc.) In order to troubleshoot this yourself, please check the error message, which will help you understand why access is not being granted. If this issue persists, please reach out to support. ## 413 | Too many bulk requests If you try to enqueue too many bulk requests at once, you'll receive an error response with a `413` status code, which your code should gracefully handle. Details on [handling bulk processing can be found here](/api-reference/bulk-and-async-processing). ## 422 | Bad data When you create or update a field, you may receive an error response with status code `422` if any fields contain bad data or required fields are missing. ## 429 | Rate limiting We have different rate limits depending on the authentication strategy used: * When using OAuth, no more than 600 requests over a rolling 60 second period for given access token. * When using API Keys, no more than 120 requests over a rolling 60 second period for a given API Key. If your request rate exceeds our limits, you will receive an error response with status code `429`, which your code should gracefully handle. We recommend spacing out your requests and performing an [exponential backoff](https://en.wikipedia.org/wiki/Exponential_backoff) to keep within the limit. ## 500 | Internal server errors If the server is overloaded or you encounter a bug, you will receive a response with status code `500`. Try again after a short period, and if you continue to encounter an error, please raise the issue with support. # Bulk create subscribers Source: https://developers.kit.com/api-reference/subscribers/bulk-create-subscribers api-reference/v4.json post /v4/bulk/subscribers See "[Bulk & async processing](#bulk-amp-async-processing)" for more information. # Create a subscriber Source: https://developers.kit.com/api-reference/subscribers/create-a-subscriber api-reference/v4.json post /v4/subscribers Behaves as an upsert. If a subscriber with the provided email address does not exist, it creates one with the specified first name and state. If a subscriber with the provided email address already exists, it updates the first name.

We will ignore custom fields that don't already exist in your account. We will not return an error if you try to add data to a custom field that does not exist. Please use Create a custom field to create custom fields before setting for subscribers.

NOTE: Updating the subscriber state with this endpoint is not supported at this time.
NOTE: We support creating/updating a maximum of 140 custom fields at a time. # Filter subscribers based on engagement Source: https://developers.kit.com/api-reference/subscribers/filter-subscribers-based-on-engagement api-reference/v4.json post /v4/subscribers/filter # Get a subscriber Source: https://developers.kit.com/api-reference/subscribers/get-a-subscriber api-reference/v4.json get /v4/subscribers/{id} # List stats for a subscriber Source: https://developers.kit.com/api-reference/subscribers/list-stats-for-a-subscriber api-reference/v4.json get /v4/subscribers/{subscriber_id}/stats Retrieve email stats for a specific subscriber. You can filter the stats by providing `email_sent_after` and/or `email_sent_before` query parameters to limit the stats to emails sent within a specific date range. Note: this functionality was added in June 2025, so no data for events before that date will be included. # List subscribers Source: https://developers.kit.com/api-reference/subscribers/list-subscribers api-reference/v4.json get /v4/subscribers # List tags for a subscriber Source: https://developers.kit.com/api-reference/subscribers/list-tags-for-a-subscriber api-reference/v4.json get /v4/subscribers/{subscriber_id}/tags # Unsubscribe subscriber Source: https://developers.kit.com/api-reference/subscribers/unsubscribe-subscriber api-reference/v4.json post /v4/subscribers/{id}/unsubscribe # Update a subscriber Source: https://developers.kit.com/api-reference/subscribers/update-a-subscriber api-reference/v4.json put /v4/subscribers/{id} We will ignore custom fields that don't already exist in your account. We will not return an error if you try to add data to a custom field that does not exist. Please use Create a custom field to create custom fields before setting for subscribers.

NOTE: We support creating/updating a maximum of 140 custom fields at a time. # Bulk create tags Source: https://developers.kit.com/api-reference/tags/bulk-create-tags api-reference/v4.json post /v4/bulk/tags See "[Bulk & async processing](#bulk-amp-async-processing)" for more information. # Bulk remove tags from subscribers Source: https://developers.kit.com/api-reference/tags/bulk-remove-tags-from-subscribers api-reference/v4.json delete /v4/bulk/tags/subscribers See "[Bulk & async processing](#bulk-amp-async-processing)" for more information. # Bulk tag subscribers Source: https://developers.kit.com/api-reference/tags/bulk-tag-subscribers api-reference/v4.json post /v4/bulk/tags/subscribers The subscribers being tagged must already exist. Subscribers can be created in bulk using the "[Bulk create subscriber](#bulk-create-subscribers)" endpoint.

See "[Bulk & async processing](#bulk-amp-async-processing)" for more information. # Create a tag Source: https://developers.kit.com/api-reference/tags/create-a-tag api-reference/v4.json post /v4/tags # List subscribers for a tag Source: https://developers.kit.com/api-reference/tags/list-subscribers-for-a-tag api-reference/v4.json get /v4/tags/{tag_id}/subscribers # List tags Source: https://developers.kit.com/api-reference/tags/list-tags api-reference/v4.json get /v4/tags # Remove tag from subscriber by email address Source: https://developers.kit.com/api-reference/tags/remove-tag-from-subscriber-by-email-address api-reference/v4.json delete /v4/tags/{tag_id}/subscribers # Tag a subscriber Source: https://developers.kit.com/api-reference/tags/tag-a-subscriber api-reference/v4.json post /v4/tags/{tag_id}/subscribers/{id} The subscriber being tagged must already exist. Subscribers can be created using the "[Create a subscriber](#create-a-subscriber)" endpoint. # Tag a subscriber by email address Source: https://developers.kit.com/api-reference/tags/tag-a-subscriber-by-email-address api-reference/v4.json post /v4/tags/{tag_id}/subscribers The subscriber being tagged must already exist. Subscribers can be created using the "[Create a subscriber](#create-a-subscriber)" endpoint. # Update tag name Source: https://developers.kit.com/api-reference/tags/update-tag-name api-reference/v4.json put /v4/tags/{id} # Upgrading to V4 Source: https://developers.kit.com/api-reference/upgrading-to-v4 Helping you upgrade from V3 of the API to V4 ## General updates * The URLs for the API endpoints are now `api.kit.com/v4/...` instead of `api.convertkit.com/v3/...`. They are otherwise unchanged unless called out specifically below. * V4 supports OAuth for applications and API Keys for automating simple tools and integrations for your personal account. V4 API Keys are not compatible with V3 * Our pagination mechanism has changed. We no longer support page or offset based pagination. All of [our pagination is now cursor based](/api-reference/pagination). This improves performance. * All errors are now returned with a consistent response shape. The response is a JSON object with a single attribute `errors`, an array of strings. * See below for a list of endpoints changed ## Endpoint specific updates ### Accounts * Get current account * [The response shape has changed](/api-reference/accounts/get-current-account). User and account information is now nested under `user` and `account` objects, respectively. ### Broadcasts * List broadcasts * The `page` parameter is no longer supported. To request next or previous pages, [use the `before` or `after` cursor](/api-reference/pagination) * Create a broadcast * The `email_layout_template` param is no longer supported. To specify the email template, use the `email_template_id` param. * [Query your email templates](/api-reference/email-templates/list-email-templates) to get the correct id * [The response shape has changed](/api-reference/broadcasts/create-a-broadcast). We no longer return `email_layout_template` and return an object for `email_template`. * The error response shape has changed. * Get a broadcast * [The response shape has changed](/api-reference/broadcasts/get-a-broadcast). We no longer return `email_layout_template` and return an object for `email_template`. * The error response shape has changed. * Delete a broadcast * [The response shape has changed](/api-reference/broadcasts/delete-a-broadcast). We return a 204 empty response. * The error response shape has changed. * Update a broadcast * The `email_layout_template` param is no longer supported. To specify the email template, use the `email_template_id` param. * [Query your email templates](/api-reference/email-templates/list-email-templates) to get the correct id * [The response shape has changed](/api-reference/broadcasts/update-a-broadcast). We no longer return `email_layout_template` and return an object for `email_template`. * The error response shape has changed. * Get stats * The error response shape has changed. ### Subscribers * List subscribers * The `page` parameter is no longer supported. To request next or previous pages, [use the `before` or `after` cursor](/api-reference/pagination) * The `from` parameter is no longer supported. It has been replaced with `created_after`. * The `to` parameter is no longer supported. It has been replaced with `created_before`. * The `updated_from` parameter is no longer supported. It has been replaced with `updated_after`. * The `updated_to` parameter is no longer supported. It has been replaced with `updated_before`. * Get a subscriber * The error response shape has changed. * Update a subscriber * The error response shape has changed. * Unsubscribe a subscriber * The URL path has changed. `/v3/unsubscribe` -> `/v4/subscribers/:id/unsubscribe` * We now require you to unsubscribe the subscriber via their id * If you need to find their id by email address, you can query with [List subscribers](/api-reference/subscribers/list-subscribers), `/v4/subscribers?email_address=` * [The response shape has changed](/api-reference/subscribers/unsubscribe-subscriber). It returns a 204 empty response instead of the subscriber. * The error response shape has changed. * List tags for a subscriber * [The response shape has changed](/api-reference/subscribers/list-tags-for-a-subscriber). `created_at` has been replaced with `tagged_at`. * The error response shape has changed. ### Custom Fields * Create a custom field * [The response shape has changed](/api-reference/custom-fields/create-a-custom-field). The created custom field is now returned nested under a `custom_field` attribute. * This endpoint no longer allows creating multiple custom fields. Use [Bulk create custom fields](/api-reference/custom-fields/bulk-create-custom-fields) instead. * The error response shape has changed. * Update a custom field * [The response shape has changed](/api-reference/custom-fields/update-a-custom-field). The updated custom field is returned nested under a `custom_field` attribute. * The error response shape has changed. ### Forms * List forms * [The response shape has changed](/api-reference/forms/list-forms). * Add subscriber to a form by email address * The `email` parameter is no longer supported. To add a subscriber by email address, use the `email_address` parameter. * List subscribers to a form * The URL path has changed. `/v3/forms/:id/subscriptions` -> `/v4/forms/:id/subscribers` * [The response shape has changed](/api-reference/forms/list-subscribers-for-a-form). Subscriber information is no longer nested under `subscription`. ### Purchases * List purchases * The `page` parameter is no longer supported. To request next or previous pages, [use the `before` or `after` cursor](/api-reference/pagination) * Create a purchase * The error response shape has changed. ### Sequences * List sequences * [The response shape has changed](/api-reference/sequences/list-sequences). Sequences are nested under a `sequences` attributes (instead of a `courses` attribute). * Add subscriber to a sequence by email address * The `email` parameter is no longer supported. To add a subscriber by email address, use the `email_address` parameter. * List subscribers to a sequence * The URL path has changed. `/v3/sequences/:id/subscriptions` -> `/v4/sequences/:id/subscribers` * [The response shape has changed](/api-reference/sequences/list-subscribers-for-a-sequence). Subscriber information is no longer nested under `subscription`. ### Tags * Create a tag * [The request shape has changed](/api-reference/tags/create-a-tag). Root `tag` attribute no longer required * [The response shape has changed](/api-reference/tags/create-a-tag). The returned tag is nested under a `tag` attribute. * The error response shape has changed. * This endpoint no longer allows creating multiple tags. Use [Bulk create tags](/api-reference/tags/bulk-create-tags) instead. * List subscribers for a tag * The URL path has changed. `/v3/tags/:id/subscriptions` -> `/v4/tags/:id/subscribers` * The `page` parameter is no longer supported. To request next or previous pages, [use the `before` or `after` cursor](/api-reference/pagination) * The error response shape has changed. * [The response shape has changed](/api-reference/tags/list-subscribers-for-a-tag). The root object is `subscribers` instead of `subscriptions` along with other smaller changes. * Tag a subscriber * The URL path has changed. `/v3/tags/:id/subscribe` -> `/v4/tags/:tag_id/subscribers/:id` * [The response shape has changed](/api-reference/tags/tag-a-subscriber). The root object is `subscriber` instead of `subscription` along with other smaller changes. * The error response shape has changed. * None of the optional params from V3 are supported in V4 * Tag a subscriber by email address * The URL path has changed. `/v3/tags/:id/subscribe` -> `/v4/tags/:tag_id/subscribers` * The `email` parameter is no longer supported. To add a subscriber by email address, use the `email_address` parameter. * [The response shape has changed](/api-reference/tags/tag-a-subscriber). The root object is `subscriber` instead of `subscription` along with other smaller changes. * The error response shape has changed. * None of the optional request params from V3 are supported in V4 * Remove tag from subscriber * The URL path and HTTP verb has changed. `POST /v3/tags/:id/unsubscribe` -> `DELETE /v4/tags/:tag_id/subscribers/:id` * [The response shape has changed](/api-reference/tags/remove-tag-from-subscriber). We return a 204 empty response * The error response shape has changed. * Remove tag from subscriber by email address * The URL path and HTTP verb has changed. `POST /v3/tags/:id/unsubscribe` -> `DELETE /v4/tags/:tag_id/subscribers/:id` * [The response shape has changed](/api-reference/tags/remove-tag-from-subscriber-by-email-address). We return a 204 empty response. * The error response shape has changed. ### Webhooks * The URL paths for webhooks have changed from `/automations/hooks` to `/webhooks`. * Create a webhook * [The response shape has changed](/api-reference/webhooks/create-a-webhook). The root object is `webhook` instead of `rule`. * The error response shape has changed. * Delete a webhook * [The response shape has changed](/api-reference/webhooks/delete-a-webhook). We return a 204 empty response. * The error response shape has changed. # App details page Source: https://developers.kit.com/kit-app-store/app-details-page Help creators get the most from your app by setting up a comprehensive app details page. The app details page is your app's storefront and is also where creators land after installing your app, so make it count. app details page ## What to include Your app details page needs: * A clear description of what your app does * Setup instructions * Links to documentation * Link to where any settings for your app are hosted * Support information * Images and videos to help your app stand out It may also include the option to alternatively send creators to your app, or an externally hosted onboarding flow, post signup. This can be configured using the `Redirect URL after install` field. An example of this flow can be seen below. example redirect flow example redirect flow ## How to configure Go to the top navigation menu ["Automate" > "Apps" > "Build"](https://app.kit.com/apps?is=created). From there, click your app's "Edit" button to display a form with fields for the app details page. Then, update these key fields: | **Field** | **What it's for** | **Restriction** | **Required for publishing** | | -------------------------- | ----------------------------------------------------------------------------------------------------------------------------------------------------------------------------------------------------------------------- | ---------------------------------------------------------------------- | --------------------------- | | App name | The name the creators see for your app across the entire Kit platform | 50 characters | ✅ | | Icon | Your app icon, which will be shown in all places where your app can be installed and used. | Under 1 MB and 1,000 x1,000 pixels. Only JPEG and PNG are accepted. | ✅ | | Summary | A short description that helps market your app, primarily shown in the card for your app on the Kit App Store main page | 90 characters | ✅ | | Description | A longer description with markdown support that helps creators understand the value your app brings them, the functionality, and how to use it. It's your opportunity to sell yourself to our massive creator base. | 5,000 characters | ✅ | | Images | Images of your app to give creators a visual representation of what it looks like and the functionality available | Up to 10 images, 4,000 x 4,000 pixels. Only JPEG and PNG are accepted. | ✅ | | Demo video URL | A video that demonstrates your app in action, to drive installations. If available, the video will appear before your app images. | YouTube video URLs only | | | Categories | The category (or categories) your app belongs to | | ✅ | | Requires a paid account | A toggle that identifies whether a paid account is required to use your app | | ✅ | | Redirect URL after install | Send users to your app, or an external onboarding flow, after they install it on Kit. Use this if setup continues on your platform. Kit will still handle authentication and track the installation before redirecting. | valid https URL | | | Support URL | Tell your users where to reach out to if they encounter issues using your app | valid https URL | ✅ | | Help article URL | A knowledge base/help center article for working with your app | valid https URL | ✅ | | Home page URL | Your app website URL | valid https URL | ✅ | | App settings URL | A URL that takes creators to a page in your app that allows them to manage the functionality of your app - from tag/custom field mapping, sync preferences and much more | valid https URL | | | Privacy Policy URL | A link to your privacy policy | valid https URL | ✅ | ## Markdown support We currently offer the following markdown support for the app description: * Headings * `# Heading 1` * `## Heading 2` * Lists * Unordered lists: * `- item 1` * `- item 2` * Ordered lists: * `1. Item 1` * `2. Item 2` * Formatting * `**bold**` * `*italic*` * `underline` * URL * `[URL text](url)` For ease, we recommend using a free online markdown converter tool to help visualise your content as you draft it out, [such as this](https://markdowntohtml.com/), or utilize an LLM to convert the styling for you automatically. ## Redirect handling The OAuth redirect parameter automatically sends creators to your app details page after authentication. The URL format is: [https://app.kit.com/apps/\{app\_id}](https://app.kit.com/apps/\{app_id}) If you have already published an app, no changes are needed if you're using our dynamic redirect parameter. Your creators will seamlessly move from installation to your getting started guide. Otherwise, you will need to update your authentication flow to end on the redirect parameter appended to the initial call to your configured `authorization URL` ## Sharing your app with creators Once you've populated the app details page form, click "Save" to save your changes. You can now go back to the [Build](https://app.kit.com/apps?is=created) page and select your app's "Preview" option to preview its app details page: app details preview ## Best practices Your App Details Page is the primary way creators discover, learn about, and evaluate your app. For installation, it serves as both an educational and sales tool for convincing creators to try your app. Below are the components of a good App Details page: Highlight your app’s purpose and how it enhances the creator’s experience. Include benefits for both the Kit integration and standalone use Describe how the app works within Kit and what it offers independently as a standalone experience Provide a concise breakdown of key features and their value

Best Practice: At least 2-3 high-quality images showcasing app functionality along with an annotation on features or benefits of the App - examples:

app details images

A configuration page lets creators customize how your app integrates with their Kit account—such as choosing which custom fields sync, toggling features on/off, or performing historical imports. This flexibility lets creators tailor the integration to their needs without unnecessary complexity. An example can be found below:

app setting page
* A general link to your app/platform support documentation * A Help Center Article specific to your Kit integration with: * Clear setup instructions * FAQs addressing common creator questions Adding a video to your app details page allows you to market your app to Kit creators even further, showcasing the benefits of your app in a new engaging way
For an example of a high-quality App Details page, [click here](https://app.kit.com/apps/924). # App versioning Source: https://developers.kit.com/kit-app-store/app-versioning Ensure creators have access to your latest functionality through app versioning App versioning in Kit ensures smooth transitions when authentication requirements change, protecting both creators and developers by maintaining compatibility while apps evolve. This guide explains how versioning works, what triggers new versions, and the implications for both creators using your app and developers maintaining it. ## Understanding app versions App versions are automatically created by Kit when certain changes to your app's authentication or scope requirements occur. These versions help manage the authentication lifecycle and ensure creators maintain proper access to your app's functionality. Kit automatically creates new app versions in the following scenarios: * Initial publication (v1) * Authentication changes When installing an app, a creator will always authenticate with the latest available version. ### Initial publication The first version is created when your app is initially published to the Kit App Store. This establishes the baseline authentication and scope requirements for your app going forwards. ### Authentication changes A new version is triggered when your app authentication requirements change after it is released. This ensures that creators are prompted to reauthenticate to gain access to any new features and functionality reliant on the new authentication method or scopes attached. The specific scenarios are: * **Access types change** - When you modify which Kit resources your app can access (API access, plugin access, or both) in your app's *Authentication* settings tab * **Authorization strategy changes** - When your plugin provider's authentication method changes (for example, switching from "No authorization" to "OAuth) in your app's *Authentication* settings tab * **Plugin scopes change** - When the cumulative scope requirements across all your plugins are modified - more details on this can be found below. ## Understanding scope changes Scopes define the specific permissions your plugins require to access data from your service. Kit tracks scopes cumulatively across all plugins in your app, and version changes occur when: * A new plugin is created with a scope that none of your other plugins currently use * A scope is added to an existing plugin that wasn't previously required by any plugin * A scope is removed from a plugin and is not used by any other plugins in your app Scopes allow you to gate access to plugins to only work for creators that have installed the correct version of your app. For example, if you have two plugins: * Plugin A uses scopes: `read:products`, `read:inventory` * Plugin B uses scopes: `read:products`, `read:customers` Your app's cumulative scopes are: `read:products`, `read:inventory`, `read:customers` Adding `write:orders` to either plugin would trigger a new version, while adding `read:products` to a third plugin would not (since it's already in the cumulative scope set). ### Adding scopes to a plugin Scopes can be added to plugins using the *Scopes* field found when editing a plugin. A plugin can have any number of scopes attached, with previously used scopes available for selection automatically from the field. When creating a new scope, press return upon completion of typing for it to be added to the plugin. Click save to publish this change and prompt upgrade for creators with the app installed. plugin scopes Using spaces in scope names can cause serialization issues when processed as arrays or comma-separated strings. We recommend using a combination of `action:resource`, such as `read:data` (opposed to `read data`) and hyphens/underscores/snake-case/camel-case for multi-word scopes, such as `read:customer_data`. ## Impact on creators When a new app version is created, the experience varies depending on the type of change: ### Re-authentication requirements Creators will be prompted to re-authenticate your app when: * **New access types are added** - For example, if your app previously only used plugins but now also requires API access * **Authorization strategy changes to OAuth** - When moving from no authentication to OAuth authentication * **New scopes are added** - When your plugins require additional permissions not previously granted When re-authentication is required, creators will be notified of updates required, through: * An icon on the [*Manage tab of the Kit App Store*](https://app.kit.com/apps): kit app store browse tab updates required * All *Install* buttons will change to *Update* for all app cards across the Kit App Store, as well as an update icon in the top right corner: app update example * A separate section for apps requiring updates at the top of [*Manage tab of the Kit App Store*](https://app.kit.com/apps?is=installed): app update section on manage tab Upon clicking the *Update* button for any apps requiring updates, the creator is guided through the authentication flow to grant all new necessary permissions. When the update is tied to authentication strategy changes, an additional banner will be shown on the *Authentication* settings page for your app to help you know when an update will be required from creators. app update warning in authentication settings page for an app ### Seamless updates Some version changes don't require creator action: * **Scope removals** - When permissions are removed, creators maintain their existing authentication * **Access type removals** - When reducing the app's access requirements ## Impact on developers As a developer, understanding app versioning helps you plan updates strategically and minimize disruption for your users. It allows you to gate plugins, to only be accessible when a certain version of your authentication strategy is installed, as well as build your apps iteratively - perhaps launching with API access only, before adding plugins at a later date. Below are a few best practices & common scenarios to ensure you are making the most out of app versioning, to make future app updates as seamless as possible. ### Best practices * **Testing plugins with new scopes before launch** - When plugins are inactive but require new scopes, ensure you re-authenticate the app in the [*Build tab of the Kit App Store\_*](https://app.kit.com/apps?is=created) to test the new functionality before launch. This allows you to verify the authentication flow works as expected before affecting production users. Other creators won't see these changes until you publish the plugin. * **Plan your scopes carefully** - Define comprehensive scopes during initial development to minimize future version changes. * **Group related functionality** - Consider future features when establishing initial scope requirements * **Avoid problematic scope formats** - Never use spaces in scope names and use consistent naming conventions for ease of management (recommended: `action:resource` format) * **Test thoroughly before publishing** - Use test mode to verify all scope changes work correctly. Ensure your OAuth server properly handles the new scope requests and validate that the re-authentication flow provides clear information to creators * **Managing version transitions** - When planning changes that will trigger a new version: * Communicate with your users - If possible, notify creators about upcoming changes through your app's channels * Bundle related changes - Group authentication changes together to minimize the number of versions * Maintain backwards compatibility - Ensure your endpoints can handle both old and new authentication tokens during transition periods * Update your documentation - Keep your app's description and support resources current with the new requirements * **Track your app's version history** - While Kit manages version creation automatically, we recommend maintaining your own changelog documenting what changed in each version. This should include the date and reason for authentication changes & which features correspond to which version requirements ### Common scenarios and solutions **Scenario: Adding a new feature** If you're adding a new plugin that requires additional scopes: 1. Consider whether the feature could work with existing scopes 2. If new scopes are necessary, plan the rollout carefully 3. Test thoroughly in development mode first 4. Communicate the value of the new feature to encourage re-authentication **Scenario: Improving security** When updating from no authentication to OAuth: 1. Implement your OAuth server following Kit's requirements 2. Test the complete flow in development 3. Prepare clear documentation for creators about why authentication is now required 4. Consider providing a grace period where both methods work if technically feasible **Scenario: Reducing permissions** If you're optimizing your app to require fewer scopes: 1. This won't require creator re-authentication 2. Update your code to work with reduced permissions 3. Remove unnecessary scope requests from your OAuth flow 4. This is generally seamless for users but improves security and trust ## Technical considerations ### OAuth server requirements When implementing scope changes, ensure your OAuth server: * Properly validates and returns the requested scopes * Handles incremental authorization if scopes are added over time * Provides clear scope descriptions in the consent screen * Maintains tokens that accurately reflect granted scopes ### Error handling Implement robust error handling for version-related scenarios: * Detect when a creator hasn't granted new required scopes * Provide clear messages about what permissions are needed and why * Guide users to re-authenticate when necessary * Gracefully degrade functionality if optional scopes aren't granted # App Authentication Source: https://developers.kit.com/kit-app-store/authentication Setting up authentication for your app We offer 2 forms of authentication for apps: * OAuth * No authentication Deciding which is right for your app depends on whether you are accessing the Kit API or whether you require authentication to tie a Kit account with an external account for your service. Though we do offer API keys to access the V4 API, these should only be used for testing purposes, with OAuth required for the app to go live. Though keys offer a quick method of testing the API before finalising your app, some endpoints - such as the `Create purchase` or `Bulk...` endpoints - require OAuth authentication, so will not be able to be tested this way. Specific authentication requirements can be found for each endpoint in the API documentation. The only time OAuth is not required would be for apps that only offer plugin functionality that rely on publically available endpoints that require no authentication. A great example of this would by the Kit GIPHY app, that requires no authorization from the creator for Kit to access GIPHY's library of images. ## Full app authentication flow The authentication flow varies based on whether your app offers API access, plugin access or both. To learn about these flows in depth, visit the [API authentication](/api-reference/authentication) and [plugin authentication](/plugins/oauth-authorization) pages, which will help guide you through the requirements and share examples to help you get up and running. The below diagram and step-by-step outline will describe the full flow when you have both API and plugin access configured for your app. If you are looking to build an app with just API or plugin access, visit the specific [API authentication](/api-reference/authentication) and [plugin authentication](/plugins/oauth-authorization) pages. full app authentication flow Authentication begins with the creator installing your app from the [Kit App Store](https://app.kit.com/apps) or your app's details page. They can click the "Install" button on either page. Kit App Store GIPHY app details page If you want to start this flow from your site as well, utilize our install url, `https://app.kit.com/apps/:app_id/install`, appended with `k_app_id=k_:app_id` (which allows us to attribute sign-ups to your particular app). To find your app id - click the "Preview" button for the app on the [Build tab](https://app.kit.com/apps?is=created) of the Kit App Store and the id will be found in the URL path `app.kit.com/apps/:app_id`.

*For example, for the GIPHY app, you would send your users to `https://app.kit.com/apps/717/install?k_app_id=k_717`*

The creator is then sent to your service's OAuth flow, whereby the creator grants Kit access to your platform, in order to retrieve the data needed for your plugin(s). Here, Kit will use the OAuth endpoints served by your authentication server to request access tokens, that will be used to authenticate all future requests to your platform. Canva OAuth page Once plugin access is completed, API authentication begins, with Kit kicking off the flow by making a GET request to the authorization URL you have set up for your app. It is important that at this stage, you store the `redirect` property that is appended to the GET request, as this will be the URL your app will need to redirect to once the Oauth flow is completed Once the creator gives authorization for your service to access the Kit API on your behalf, your app will request an access and refresh token that will be used for all future app calls to the API. Kit OAuth page Once API authentication is completed, redirect the user back to the `redirect`, URL provided as a query parameter in the initial authorization request. This will ensure the installation flow is tracked and completed properly. This property currently sends users back to your app's details page, which will help guide them through using and getting the most out of your app they have just added to their creator kit. If you have set up the `Redirect URL after install` field in your app's settings, a modal prompting creators to continue their journey on your configured site will appear at this point. See this section in the [app details page guide](/kit-app-store/app-details-page#how-to-configure) for more details. example redirect flow With installation now complete, both Kit and your service will continue to refresh access tokens as required; using the refresh token shared in the same response as the access token to request an updated access token, when the current one has expired.
## Externally initiating installations You can now direct users to install your app directly from your own website or marketing materials, without requiring them to first visit the Kit App Store. This installation flow ensures both plugin and API authentication are completed properly, just like installations initiated from the Kit App Store. After successful installation, users will be redirected back to the Kit App Store where we can track the completed installation. To do this, point users directly to the installation URL using this format: `https://app.kit.com/apps/:app_id/install?k_app_id=k_:app_id` replacing `:app_id` with your specific app ID. The `k_app_id` parameter allows us to attribute new Kit signups to your app. If you'd like the user to return back to your site after completing installation, you'll need to configure allowlisted domains in your app settings. This is needed for security reasons. Then include a URL, including the scheme, that you'd like the user to be redirected back to when the install is finished in the `return_to` query param. The domain must be one of the domains that you allowlisted in your app settings. `https://app.kit.com/apps/:app_id/install?k_app_id=k_:app_id&return_to=https://yoursite.com/example/path` ### Finding your app ID You can locate your app ID in two ways: ##### From the Build tab * Go to the Build tab in the Kit App Store * Click the 'Edit' button on your app" /> * Extract the ID from the URL (e.g. `https://app.kit.com/apps/924/edit` means your app ID is `924`) ##### From your app details page * The app ID appears at the end of your app's details page URL (e.g. `https://app.kit.com/apps/924`) # Best practices Source: https://developers.kit.com/kit-app-store/best-practices What makes a good App on Kit? Apps in the Kit App Store come in all shapes and sizes, helping our wide range of creators in a multitude of ways, they all however should: * connecting external tools or platforms to Kit * enhancing Kit’s functionality through plugins such as our email editor content blocks * or, streamlining workflows or boosting audience monetization/engagement ## Prohibited apps on Kit The following types of Apps will not be permitted for listing on the Kit App Store: * **Apps that do not use Kit’s APIs, Webhooks, or Plugin Environments:** Apps must meaningfully interact with Kit’s platform; if an app does not make use of Kit’s APIs, webhooks, or plugins in a way that improves a creator’s workflow, it will not be approved. * **Single-Creator Private Apps:** Apps must be designed for broad adoption by multiple creators. Private, single-use apps built for only one specific creator are not eligible for listing in the public Kit App Store. * **Apps that duplicate existing functionality:** If an app replicates the functionality of an existing approved app with no clear differentiation, it will not be listed. (e.g., if a Mighty Networks integration already exists, another App offering the same core features without added value won’t be approved). * **Apps that primarily extract Kit data without providing functionality:** Apps must enhance a Creator’s experience within Kit - not just export data elsewhere. Any app that solely exists to extract user, subscriber, or campaign data from Kit without adding direct functionality or engagement within Kit is prohibited. * **Apps that do not comply with Kit’s data privacy & security standards:** Apps must not share, sell, or misuse creator or subscriber data. Any app that violates Kit’s privacy policy or terms of service will be denied listing. Any app that stores subscriber data externally must have explicit consent mechanisms in place. * **Apps that restrict Kit’s access to user or subscriber data:** Apps should not restrict Kit’s ability to access or process creator account info, email lists, or campaign data. * **Apps that automate sending unsolicited or non-compliant emails:** Any app that automates sending unsolicited bulk emails or enables spam-like behavior will be rejected. Apps must comply with all email regulations (CAN-SPAM, GDPR, etc.) and cannot facilitate non-consensual communication. * **Apps that misrepresent functionality or use deceptive marketing:** Any app that misleads creators about its functionality or falsely claims integrations that do not exist will not be approved. * **Apps that have no support resources:** Apps must provide clear support documentation or a designated support contact. Every app should have a help center article specific to its Kit integration, beyond just generic product documentation. Apps that lack any visible support structure will not be approved. # Building apps Source: https://developers.kit.com/kit-app-store/building-apps Building an app for the Kit App Store Kit is opening up a world of opportunities and functionality for our creators by empowering third-party developers like you to build on top of our application and better integrate the creator’s toolkit in one place. Building an app on Kit is completely self-serve. Here's how you can build, test, and publish an app in your Kit account. ## Creating your app Visit the Kit App Store by going to **"Automate"** in the top navigation menu, followed by [Apps](https://app.kit.com/apps). From there, select the [Build tab](https://app.kit.com/apps?is=created), and click + New app at the top right. creating-a-new-app A form will pop up. Fill it out with your app's name, and click "Save". Once you do this, you'll be directed to an **app details** settings page for your newly created app. app details settings The details you provide here will be shown on the app details page that appears when users click your app's "Learn more" option in the Kit App Store. learn more Kit App Store button Preview the app details page by clicking your app's "Preview" option in the ["Build" tab](https://app.kit.com/apps?is=created) of the Kit App Store. app preview button Only the `App name` field is required when you create and test your app. But you'll need to provide more information before you can publish the app to the Kit App Store. This information includes: * Icon * Summary * Description * Resource links Click "Save" to save the changes to your app's details. ## API and plugin access An app can contain either API access, one or many plugins, or both. Here are the key differences: * **API access:** You can allow creators to install apps that can link together external platforms to work in harmony. We control authentication here and developers have to request access on behalf of a creator to us to approve. This is all built upon V4 of our API. * An example API only app would be TeachKit - that solely utilizes the Kit APIs to manage subscribers that use TeachKit's free online courses. * **Plugins:** You can add content directly into the Kit app UI. Kit needs to authenticate against the third party to be able to pull the data required to be rendered within Kit. * An example plugin only app would be GIPHY - which utlises the [media source plugin](/plugins/media-source/overview) to allow creators to insert gifs directly from GIPHY into their email content. No additional API access is required for this app. * **Both:** You can also have apps that combine API and plugin access, with apps such as Mighty Networks offering subscriber and tag syncing alongside [content block plugins](/plugins/content-blocks/overview), helping creators manage and promote their communities through Kit. To set up your app authentication strategies, visit the "Authentication" tab, where you can configure and toggle API and plugin access on and off. app authentication For more details on authentication, visit our [app authentication guide](/kit-app-store/authentication), or visit the API and plugin specific pages: * [API](/api-reference/authentication) * [Plugins](/plugins/oauth-authorization) ## Testing your app 
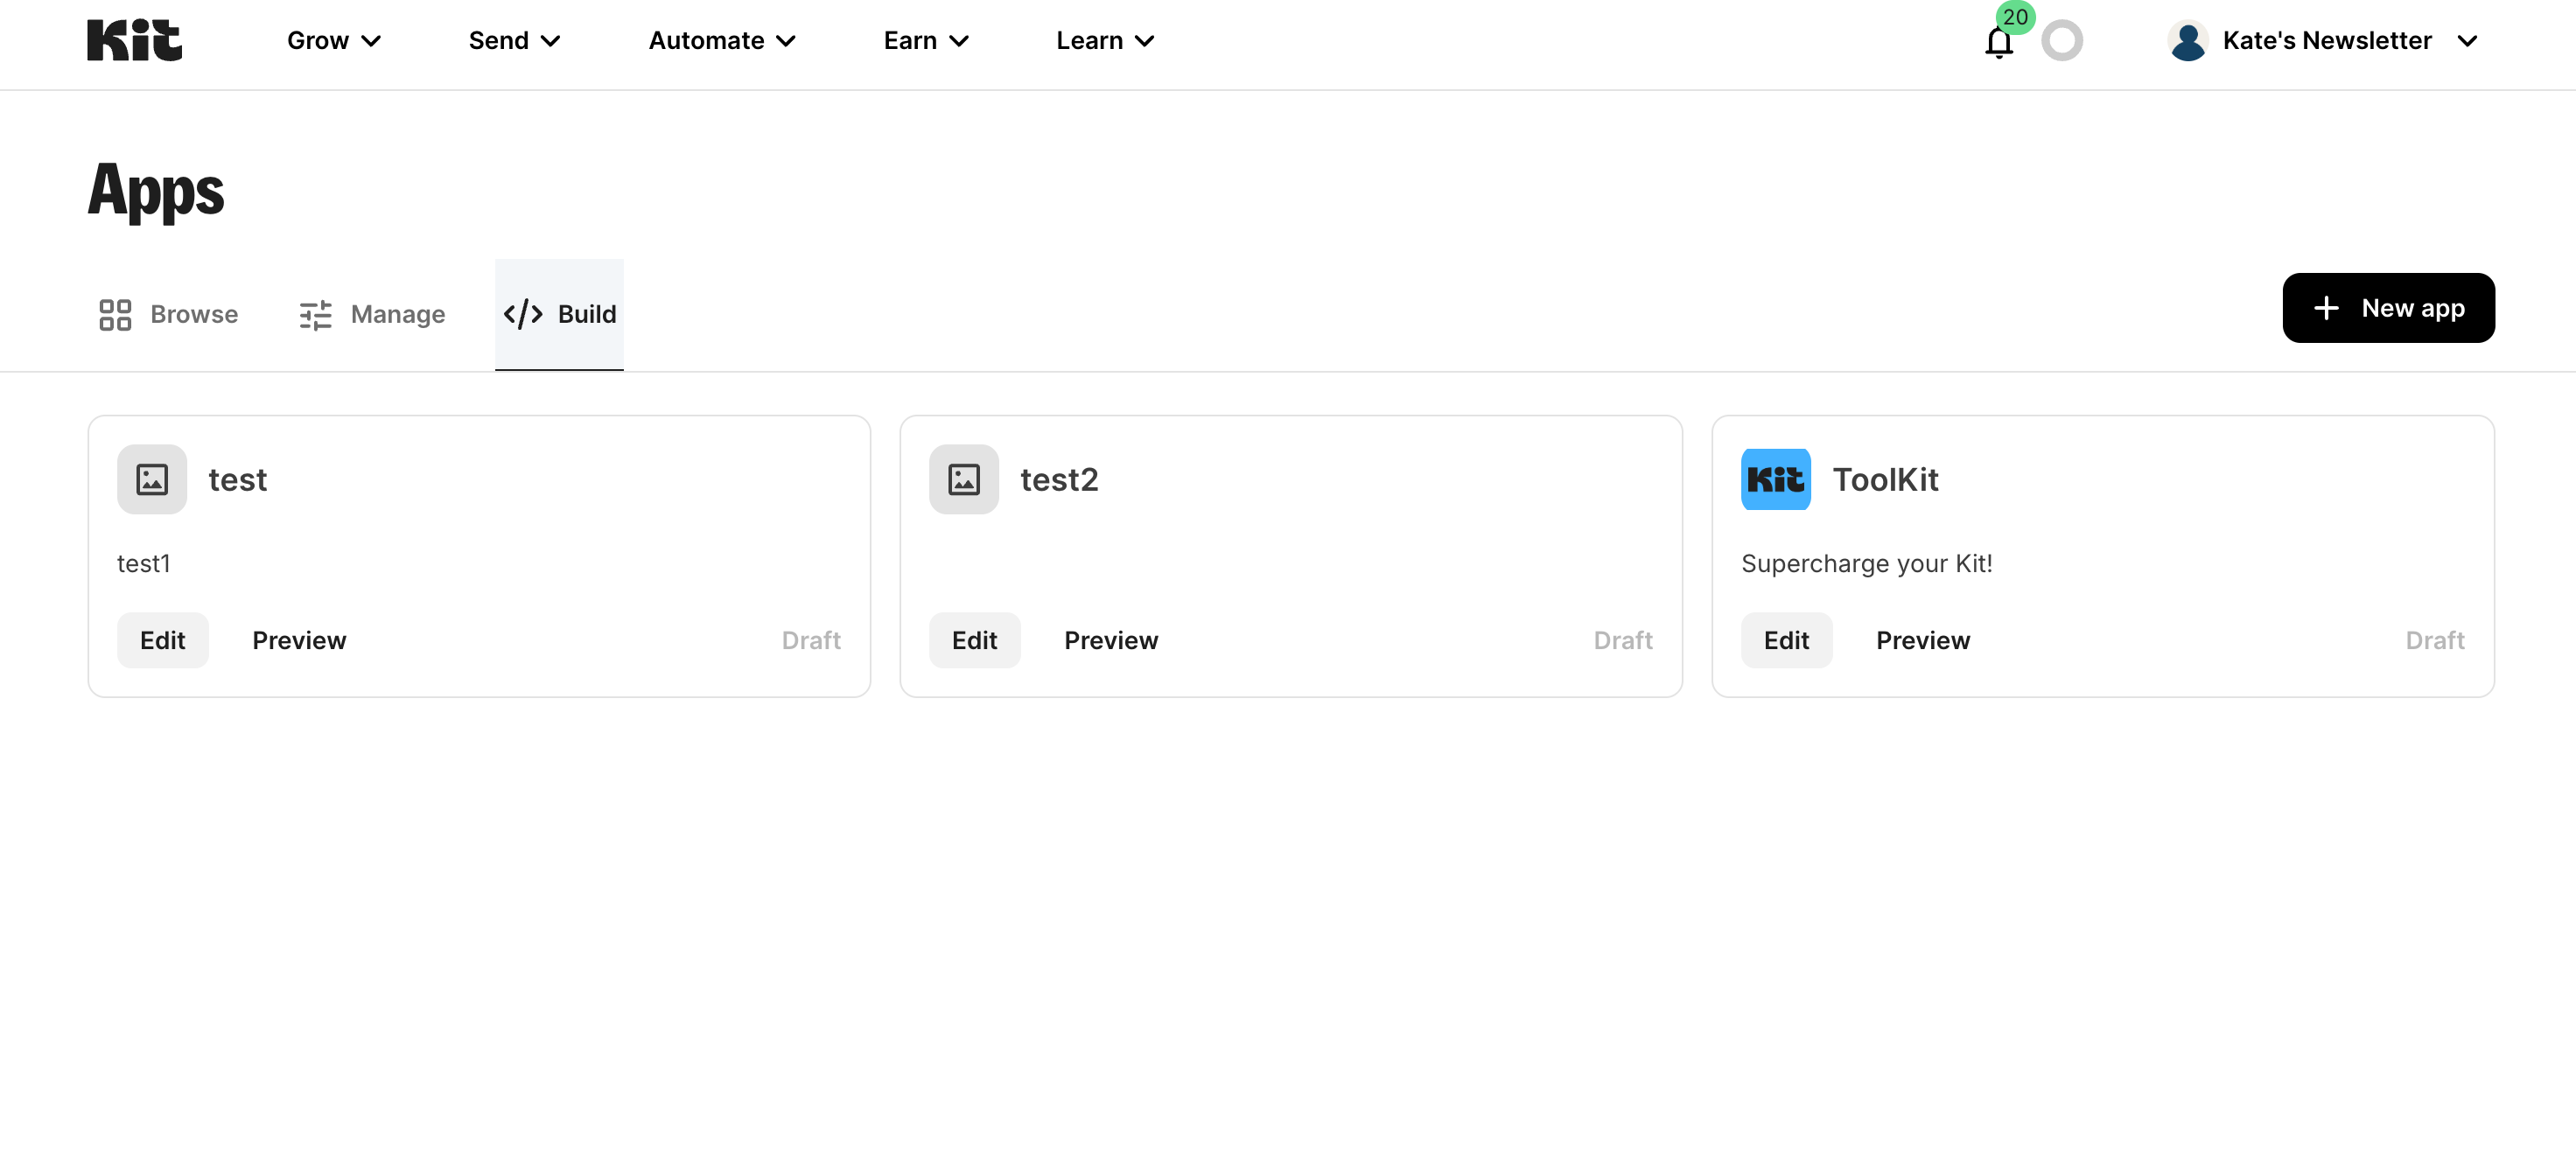
View your apps on the ["Build" tab](https://app.kit.com/apps?is=created) of the Kit App Store. You'll be able to see: * Whether you have installed the app—from the display of the green installed tick, or * Whether it is a draft, from the "Draft" badge in the bottom corner. When is the "Draft" status, only you are able to see the app in your own account. testing your app From here, click Preview to view your app's app details page, as well as install it within your own account. GIPHY app details page The app will not be publically discoverable for other Kit users to install until you've published it. ### V4 API Keys Though all apps accessing our API require OAuth authentication before they can be published, a great way of prototyping and testing our API's functionality is to use V4 API keys. More details on creating and managing API keys [can be found here](/api-reference/authentication). API keys are meant for individual use only. If you're creating something for people to use, you'll need to build an app—giving you access to plugins, bulk and purchase endpoints, higher rate limits, and more. # Going live Source: https://developers.kit.com/kit-app-store/going-live Getting your app live onto the Kit App Store Once you have built and tested out your app, it's ready to be published to the Kit App Store. The guide below helps map out how to get yoru app live and what to check before submitting for approval. ## App review checklist To streamline the review process and reduce delays, apps must submit the following: ### ✅ App requirements * App authentication * Developers must use OAuth for user authentication instead of API keys for a secure, seamless installation experience when Kit API access is required * In order to allow tracking and validation of installs, the installation process must either: * start and end on the Kit App Store * start the flow externally, utilizing the correct installation URL, with the appended attribution tracking: `https://app.kit.com/apps/:app_id/install?k_app_id=k_:app_id`. Details on setting this up [can be found here](/kit-app-store/authentication#externally-initiating-installations) * you can also utilize the `Redirect URL after install` functionality ([which can be found here](/kit-app-store/app-details-page#how-to-configure)) to send creators to an external site upon completion of the install flow and redirect back to Kit. * General UX * Apps should offer intuitive navigation and an easy onboarding experience * Clear access to help center articles or other support documentation is mandatory to minimize user confusion * Technical standards * Apps must follow [standard best practices](/api-reference/response-codes#429-%7C-rate-limiting) to avoid API rate limiting * Apps should follow the relevant plugin recommendations * App details page * Ensure your app details page follow the best practices set out in [the app details guide](/kit-app-store/app-details-page#best-practices), to ensure Kit App Store quality, but also help drive installations for your app ### ✅ Functionality description * Submit a clear, concise description of the app’s intended functionality so that we know what to test it for * Explain the app’s key flows and use cases (both within and outside Kit as a standalone experience) so testers understand what to evaluate ### ✅ Test credentials & OAuth testing If the app requires a paid account, developers must provide us with test credentials for use during the review process. Apps must support all potential OAuth flows. Testers will evaluate: * **Not logged in:** Testing OAuth from a logged-out state * **Logged in:** Testing OAuth from an already logged-in account * **New User Signup:** Supporting a net new account creation (you’ll need to provide us with the ability to create a trial account or use a promo code to enable this) * **Pre-loaded Data:** For apps with sync functionality (e.g., importing contacts), the test account must include pre-loaded data to simulate a realistic creator experience ### ✅ OAuth & onboarding * Developers must use OAuth for user authentication instead of API keys for a secure, seamless installation experience * The installation process must start and end on Kit in order to allow tracking and validation of installs ## Publishing your app Once you've gone through and adhered to the points outlined above, send the app for approval by clicking the "Submit for approval" button in the "Distribution" tab within your app settings: submit app for approval 
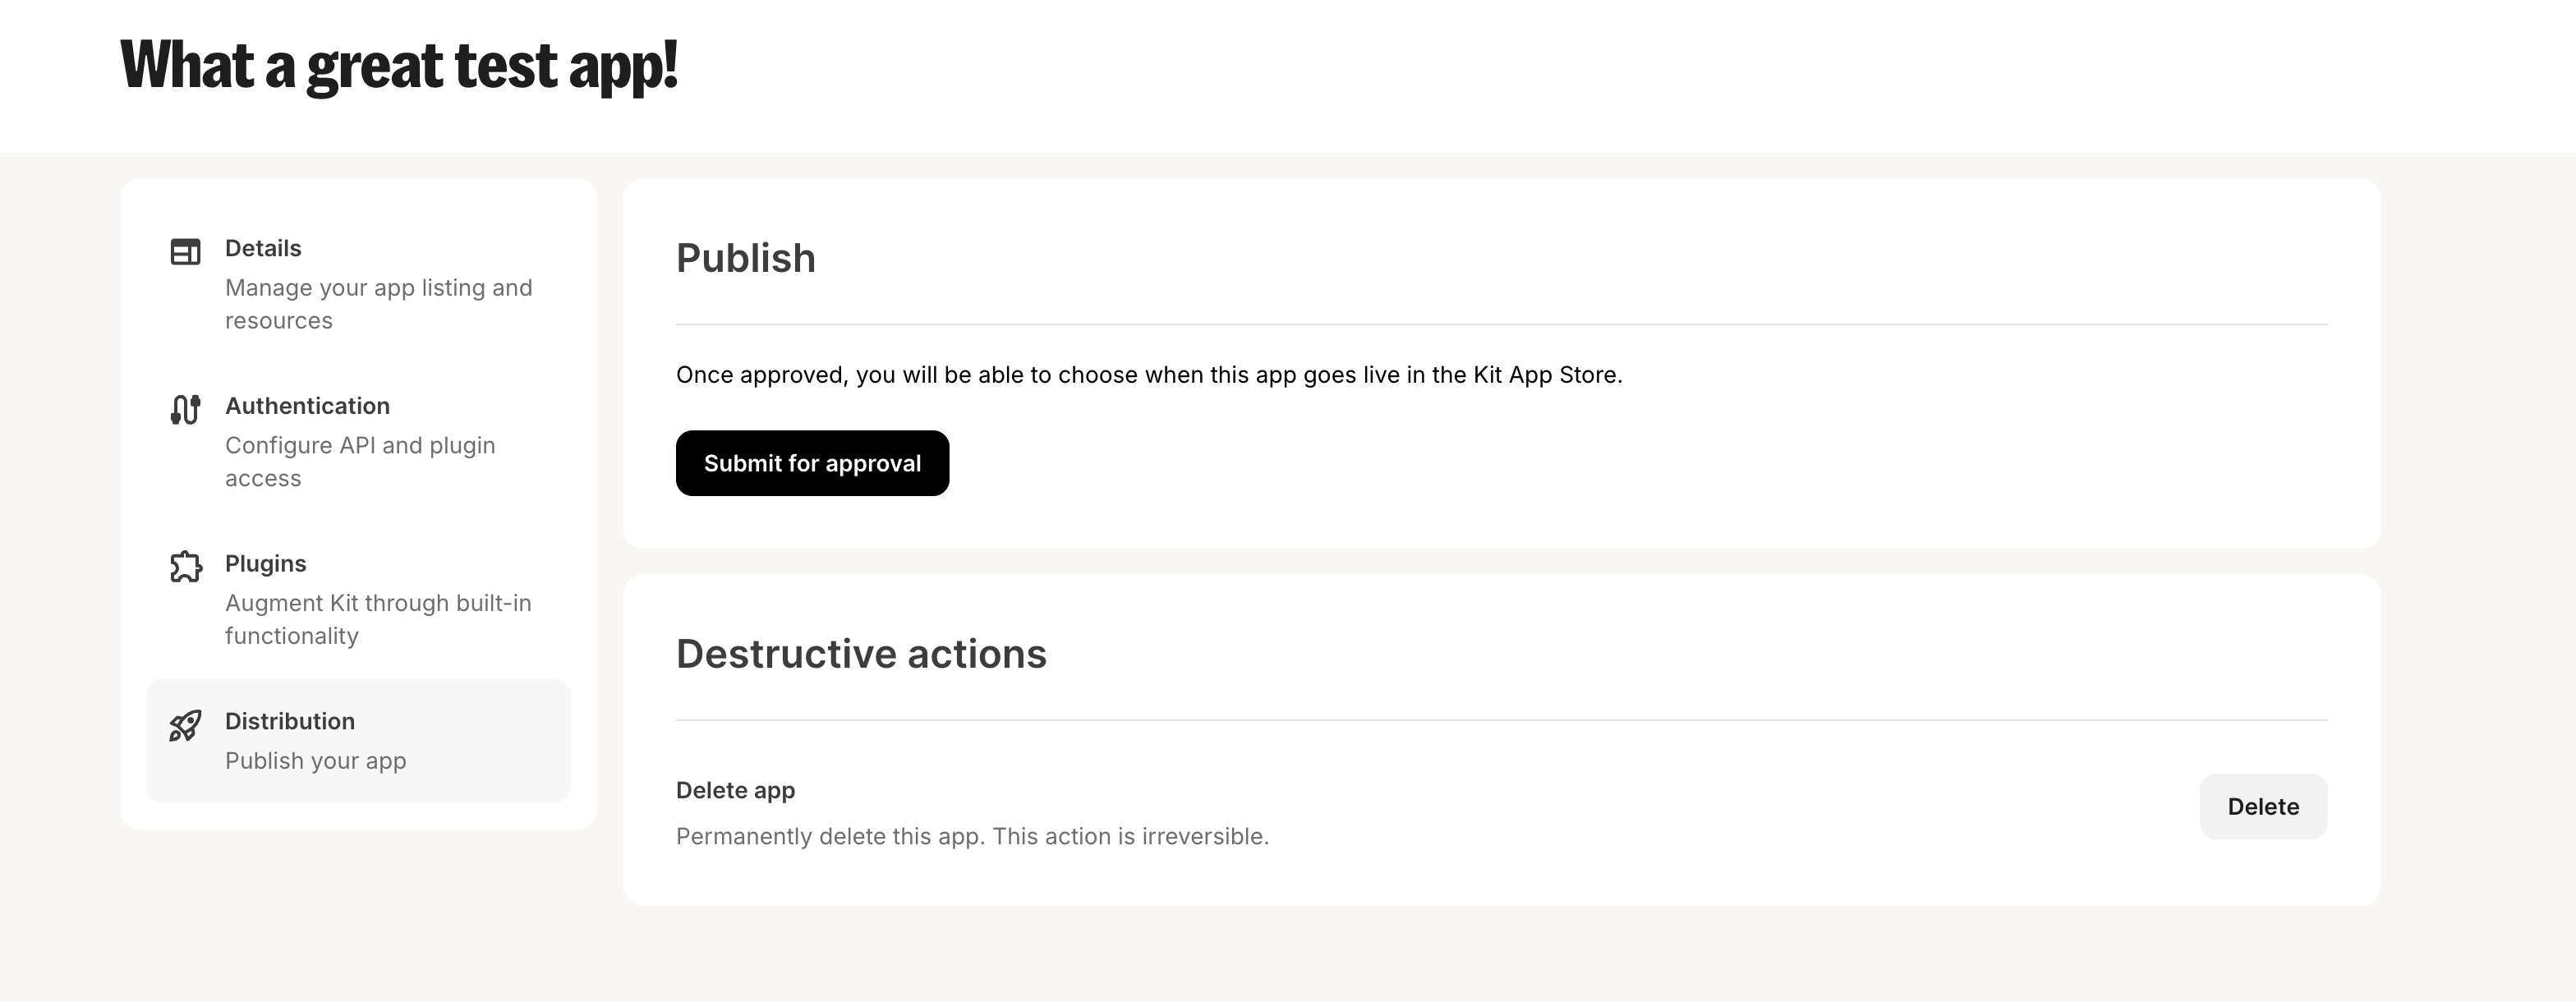
Click the "Submit for Approval" button in the window that pops up to confirm. submit app for approval confirmation Your app will be submitted to us for approval. If we need a test account with your service to review your app, please send the test account's information to [apps@kit.com](mailto:apps@kit.com) alongside any details on the app functionality and steps for testing. Details on what makes a great app and what to avoid can be found in our [best practices guide here](/kit-app-store/best-practices). Once approved by our team, the developer account will receive an email that the app is ready to be published. When ready, hit "Publish" in the "Distribution" tab of your app and your app will automatically be available in the [Kit App Store](https://app.kit.com/apps) for all eligible creators (currently all paid plans), as well as our [Kit app marketing site](https://kit.com/apps). ​ If we reject your app, we'll send you an email explaining the issues we found. You can then make changes to your app and click "Resubmit for approval" to have us review it again. resubmit app for approval # Kit Developer Assistant Source: https://developers.kit.com/kit-app-store/kit-developer-assistant The [Kit Developer Assistant](https://chatgpt.com/g/g-688120c86d6c819190cd42ec2f26fcd3-kit-developer-assistant-kit-app-store) is your on-call technical guide for building on the Kit platform. It’s a specialized version of ChatGPT trained on Kit’s developer documentation, App Store guidelines, API reference, and development best practices. **What you can use the Kit Developer Assistant for:** * Understanding Kit’s API endpoints, authentication flows, and plugin architecture in plain language * Providing code samples and integration patterns tailored to your app type (Media Source, Subscriber Sync, Email Editor Plugins, etc.). * Highlighting required fields and submission criteria for App Store listings * Walking you through common tasks like OAuth setup, post-install redirects, and handling webhooks * Troubleshooting integration issues by spotting gaps or missteps in your flow * Drafting your App Details page copy in seconds **Tip:** The Kit Developer Assistant is a complement to, not a replacement for, the official documentation - use both together for the best results. If you notice any inconsistencies from the Kit Developer Assistant, please email us your feedback at [apps@kit.com](mailto:apps@kit.com). # Managing your apps Source: https://developers.kit.com/kit-app-store/managing-your-apps Updating your app once it's live Once an app has been published, it will be available for all creators to install and use - but what happens if you want to edit your app, stop new users from installing it or removing it completely from the Kit App Store? ## Editing your app Once an app is live, you can find and edit it from within the ["Build" tab](https://app.kit.com/apps?is=created) of the Kit App Store. Here you can update your app details page, your authentication settings or create and manage existing plugins. build tab It is important to note that once published, any updates to your app will be reflected immediately, for all creators that have already installed your app as well as new installations. Therefore, we recommend that you make edits on an unpublished test version of the app, so that you can test and preview the changes thoroughly, before moving them across to the published app. ## Unpublishing or deleting your app To **unpublish your app**, go to the [Build tab](https://app.kit.com/apps?is=created) and click your app's "Edit" button. Navigate to the "Distribution" tab, and click the "Unpublish" button at the bottom to unpublish it. unpublish your app When you unpublish your app, it will no longer be publicly visible in the Kit App Store. However, **creators who already have your app installed can continue to use it**. To make your unpublished app unavailable for use (while still keeping it installed for creators), you'll need to: * Deactivate the app's plugin authentication, and/or * Pause the sending of API calls from your app. Alternatively, you can **delete your app**. This will remove it from the Kit App Store and the accounts of creators who have installed it. These creators will no longer be able to use your app. Delete your app by clicking your app's "Edit" button from the [Build tab](https://app.kit.com/apps?is=created) in the Kit App Store. Navigate to the Distribution tab, and click the "Delete" button at the bottom. delete your app # Kit App Store overview Source: https://developers.kit.com/kit-app-store/overview **Welcome to the Kit App Store!** Kit is the email-first operating system for creators who mean business. Our platform serves serious creators who have transformed their expertise into successful full-time businesses using Kit to grow their email lists, manage subscribers, and automate their marketing. The Kit App Store helps creators run their businesses more efficiently by filling gaps between the multiple services they rely on. By building apps for Kit, you'll serve thousands of creators who collectively reach millions of subscribers worldwide. ## Why build a Kit app? Kit is home to a thriving ecosystem of serious creators who have transformed their expertise into successful full-time businesses. These creators don't just dabble in content creation—they foster deep relationships with their audience to build profitable and sustainable businesses that add real value to the people they serve. When you develop an app with Kit, you’re tapping into: * \$250 billion creator economy market * 60,000+ Kit creators * 2.1 billion emails sent on average per month * \$1.2 millions sales on average per month 70% of Kit customers have at least one app or legacy integration installed. With in-app and Kit newsletter spotlights, your app will reach our customer base and help them solve every-day creator pain points. ## Different types of apps you can build The Kit App Store supports a diverse range of applications designed to enhance creators' workflows and business operations. * **Customer relationship management:** Connect to Kit’s subscriber tag management system and build apps that help creators track and follow up with prospects efficiently for sales deals, podcast scheduling, affiliate deals, and more. * **Content distribution:** Connect to Kit’s email editor or media gallery and automatically pull in content from other tools into emails more efficiently to drive more email engagement, more traffic to your content, and more revenue—all while saving time. * **Digital products & memberships:** Build apps that help creators set up and sell digital products, courses, or membership groups that sync with a creator’s email list in Kit. Make it easy for creators to build, sell, and manage their customers all in one place. * **AI-assistance:** Explore AI opportunities that help creators build content outlines, write compelling subject lines, promote products, write newsletters, and more  * **Data analysis:** Use Kit’s API endpoints to pull email performance data and build dashboards or reports to help creators better understand what’s working and where to improve to drive better results. * **Audience learning & building:** Creators are always looking for ways to gain more information about their subscribers for better personalization and segmentation. From surveys to quizzes, build an app that gives creators the opportunity to learn even more about their subscribers. * **Task and workflow management:** Create productivity apps that help creators manage their content calendars, automate repetitive tasks, and streamline their business operations within the Kit ecosystem. Apps can be built using either API access to connect external platforms or as plugins that add content directly into Kit's UI. The self-serve development platform gives you complete control over your app's functionality and user experience. Here’s the [quick start guide](/kit-app-store/quick-start-guide) to start building your app. # Quick start guide Source: https://developers.kit.com/kit-app-store/quick-start-guide Getting you up and running on the Kit App Store ## Getting started on the Kit App store Welcome to the Kit App Store! Whether you’re building an app to help creators streamline their workflows, enhance monetization, or improve audience engagement, this guide will walk you through the key steps to getting started. Before you begin building, follow these steps to set yourself up for success: * **Create a Kit account:** To get API Access, you first need to create a Kit account. Then, go to [the "Build" tab](https://app.kit.com/apps?is=created) on the Kit App Store to create your app. * **Join our developer community:** Request access to our Kit developer community by emailing [apps@kit.com](mailto:apps@kit.com). This is the best place to ask questions, get support from peers, and connect with other developers. * **Review our technical documentation:** Familiarize yourself with [Kit’s APIs](/api-reference/overview) and [plugin environments](/plugins/overview) by checking out the Kit developer docs. * **Understand app requirements & guidelines:** Make sure your app aligns with our [app requirements checklist](/kit-app-store/going-live#app-review-checklist). Apps that do not meet our standards will not be approved for listing on the Kit App Store. ## Building your App on Kit Once you’re set up, it’s time to start building! * **Use OAuth for authentication:** Kit supports OAuth-based authentication for secure user sign-ins. Learn how to implement your [app authentication here](/kit-app-store/authentication). * **Design for a seamless user experience:** Your app should provide a clear and intuitive user experience. Follow our [best practices](/kit-app-store/best-practices) to ensure a smooth experience. * **Ensure proper API usage:** Your app must make meaningful use of Kit’s APIs, webhooks, or plugins to be approved. * **Prepare your app listing:** Every app needs a high-quality app details page that helps creators understand what it does. Think of this as both a way to guide creators as well as pitch them on installing your app! Follow our [guide for best practices](/kit-app-store/app-details-page) for filling this out. For a more detailed guide on building apps, see our [full guide for building apps here](/kit-app-store/building-apps). ## Submitting your app for review When your app is ready, follow these steps to submit it for review: * **Complete the pre-submission checklist:** Ensure your app meets all technical and UX requirements. See the [full checklist here](/kit-app-store/going-live#app-review-checklist). * **Submit your app:** Submit your app for approval via the "Distribution" tab while editing your app, and provide app details, test credentials (if applicable), and a brief description of functionality to [apps@kit.com](mailto:apps@kit.com). * **Review & approval timeline:** The Kit team will review your app within 5 business days and provide feedback via email. If changes are required, you will receive an email that your app has been rejected, but don’t fret! That just means you need to update and resubmit based on the required changes. * **Go live & start driving installs:** Once approved, publish your app from the "Distribution" tab and your app will be listed on the Kit App Store, as well as other marketing placements on Kit’s website, and you can start promoting it! ## Ongoing support & resources * **Developer docs:** Find troubleshooting guides, FAQs, and more throughout our developer docs. * **Get help:** If you run into issues, reach out via [apps@kit.com](mailto:apps@kit.com), [reach out to our support team](https://kit.com/support), or post in our developer Slack community (please note that the Slack community is not an expedited support channel and is more for peer-to-peer help from other developers who have built Kit apps). # Kit Developer Docs MCP Source: https://developers.kit.com/mcp/kit-developer-docs-mcp Connect AI coding agents directly to Kit's developer documentation using the Model Context Protocol The Kit Developer Docs MCP (Model Context Protocol) server gives AI coding agents direct, real-time access to Kit's developer documentation. Rather than copying and pasting docs into your AI client, your agent can query Kit's full API reference, App Store guidelines, plugin architecture, and more on demand — always up to date. In supported clients, your agent can go further and make live Kit API calls on your behalf and spin up local servers to test OAuth flows end-to-end. Using the MCP server is also significantly more effective than relying on your AI client's web search: * **Always current** — MCP queries the live documentation directly, so your agent is never working from a stale search index or cached page * **Token efficient** — web search retrieves full pages including navigation, markup, and boilerplate, all of which consume context window tokens. MCP returns only the structured content your agent actually needs, keeping responses faster and context usage lean ### MCP server URL To get started, point your MCP-compatible AI assistant to this remote MCP URL — for example, by [adding a custom connector in Claude](https://support.claude.com/en/articles/11175166-get-started-with-custom-connectors-using-remote-mcp). See full setup guides below. ``` https://developers.kit.com/mcp ``` ## What your agent can do Once connected, your AI agent can: * Query any Kit API v4 endpoint reference, including request parameters, response shapes, and authentication requirements * Understand Kit App Store requirements, submission criteria, and app configuration options * Look up plugin component library usage, content block flows, and automation node configuration * Reference OAuth flows, webhook event schemas, and pagination patterns * **Make live API calls on your behalf** — in supported agentic clients (such as Claude Desktop, Claude Code, and Cline), your agent can use the API reference to construct and execute Kit API requests directly, without you writing a single line of code * **Spin up a local OAuth server for testing** — ask your agent to start a local redirect server so you can complete the OAuth authorization flow end-to-end in your development environment before shipping. See [App Authentication](/kit-app-store/authentication) for how to configure OAuth in your app and make authenticated API calls ## Setup guides ### Claude Desktop 1. Open Claude Desktop and go to **Settings → Developer → Edit Config**, or open the config file directly: * macOS: `~/Library/Application Support/Claude/claude_desktop_config.json` * Windows: `%APPDATA%\Claude\claude_desktop_config.json` 2. Add the Kit MCP server: ```json theme={null} { "mcpServers": { "kit": { "url": "https://developers.kit.com/mcp" } } } ``` 3. Save and restart Claude Desktop. The Kit docs will be available as a tool in all your conversations. ### Claude Code Run the following command in your terminal: ```bash theme={null} claude mcp add --transport http kit https://developers.kit.com/mcp ``` The Kit MCP server will be available in all Claude Code sessions in that project. ### Cursor 1. Open Cursor and go to **Settings → Tools & Integrations → MCP Tools → New MCP Server**. 2. Add a new server with the following configuration: ```json theme={null} { "mcpServers": { "kit": { "url": "https://developers.kit.com/mcp" } } } ``` Alternatively, create or edit `.cursor/mcp.json` at the root of your project with the same configuration. See [Cursor's MCP guide](https://docs.cursor.com/context/model-context-protocol) for more details. ### Windsurf 1. Open Windsurf and go to **Windsurf Settings → Cascade → MCP Servers → Add Server**. 2. Select **HTTP/SSE** as the server type and enter `https://developers.kit.com/mcp` as the URL. Or edit `~/.codeium/windsurf/mcp_config.json` directly: ```json theme={null} { "mcpServers": { "kit": { "serverUrl": "https://developers.kit.com/mcp" } } } ``` See [Windsurf's MCP documentation](https://docs.windsurf.com/windsurf/mcp) for more details. ### Cline (VS Code) 1. Open VS Code with the Cline extension installed. 2. In the Cline sidebar, click the **MCP Servers** icon and then **Edit MCP Settings**. 3. Add the Kit server: ```json theme={null} { "mcpServers": { "kit": { "url": "https://developers.kit.com/mcp", "transport": "http" } } } ``` See [Cline's MCP documentation](https://docs.cline.bot/mcp/connecting-to-a-remote-server) for more details. ## Other ways to use AI with Kit docs The MCP server is the recommended way to give your AI agent access to Kit's developer documentation — it's real-time, always up to date, and requires no manual steps. For AI clients that don't yet support MCP, there are two additional options. ### llms.txt [llms.txt](/llms.txt) is a single file containing all the content in the Kit developer documentation hub, following an emerging industry standard for making web content accessible to LLMs. You can load it by pasting the URL directly into your AI client, or copying and uploading the file if your client doesn't support URL reading: * [**Open in Claude**](https://claude.ai/new?q=Read+from%20https%3A%2F%2Fdevelopers.kit.com%2Fllms.txt) * [**Open in ChatGPT**](https://chatgpt.com/?hints=search\&q=Read%20from%20https%3A%2F%2Fdevelopers.kit.com%2Fllms.txt%20so%20I%20can%20ask%20questions%20about%20it.) * **Cursor:** Add `https://developers.kit.com/llms.txt` as a docs source via [Cursor's @Docs feature](https://docs.cursor.com/context/@-symbols/@-docs) * **Other LLMs:** Request your client to read from `https://developers.kit.com/llms.txt` llms.txt can become large enough to exceed some LLMs' context windows. If that happens, use the page-level method below, or switch to the MCP server which retrieves only what's needed on demand. ### Page-level For focused questions on a single topic, every page in the docs has a **Copy page** button in the top-right corner. This copies the page's markdown content, which you can paste directly into any AI client — or use the **Open in ChatGPT / Open in Claude** shortcuts to start a conversation immediately. AI developer documentation menu ## Tips for working with AI agents * **Be specific in your prompts.** Ask your agent to "look up the Kit API v4 subscribers endpoint" rather than "how does Kit work" — targeted queries return better results. * **Combine with page-level context.** For deep dives into a single topic, use the "Copy page" button on any docs page alongside your MCP-connected agent. * **Verify important details.** AI agents can misinterpret or hallucinate details — always verify generated code against the [API reference](/api-reference/overview) before shipping. If you run into issues or have feedback on the Kit MCP server, reach out to us via the [Kit Developer Community](https://kit.typeform.com/to/f8urvmPe). # Color picker Source: https://developers.kit.com/plugins/component-library/color-picker The color picker allows creators to customize content to better reflect their branding and style. It is commonly used to allow the creator to change the color of backgrounds, buttons and text to better fit in with their email templates. example color picker ## Compatibility | Plugin type | Availability | Additional notes | | -------------- | ---------------------------- | ---------------- | | Content blocks | | | | Media source | | | ## Properties `color` - the type of the component A unique internal-only identifier that is posted to an app's plugin server to share values inputted by the creator Creator-facing identifier that is shown in the plugin environment Creator-facing identifier that is shown in the plugin environment Brief creator-facing explanation that clarifies the component's purpose and usage. When set to `true`, displays a "Transparent" toggle that allows creators to set the color to transparent. Defaults to `false`. Allows for the field to be shown conditionally. dependent on other fields. See [dependencies page](/plugins/component-library/dependencies) for more details. Name of the dependent field Value for the dependent field required to show this field. To show when any value is inputted, leave out this property. ## Best practices ### Automatic styling When using the `color picker` for content blocks, alongside the settings object, Kit also shares data on the styles used within the email template - allowing your plugin to assume the styling of the email automatically, to make it feel as native as possible. Details on the style data available can be found below: * p * h1 * h2 * h3 * h4 * h5 * h6 * ol * ul * blockquote * a * "color", * "font-family", * "font-size", * "font-weight", * "letter-spacing", * "line-height", * "text-align", * "text-transform", * "margin-top", * "margin-right", * "margin-bottom", * "margin-left", * "padding-top", * "padding-right", * "padding-bottom", * "padding-left" ```json theme={null} { "settings": { "postId": "default-to-generosity-id-123", "favoriteColor": "#ff0000" }, "styles": { "p": { "color": "rgb(45, 45, 47)", "font-family": "Charter, Georgia, Times, \"Times New Roman\", serif", "font-size": "18px", "font-weight": "400", "letter-spacing": "normal", "line-height": "27px", "text-align": "start", "text-transform": "none", "margin-top": "18px", "margin-right": "0px", "margin-bottom": "18px", "margin-left": "0px", "padding-top": "0px", "padding-right": "0px", "padding-bottom": "0px", "padding-left": "0px" }, "h1": { "color": "rgb(0, 0, 0)", "font-family": "-apple-system, \"system-ui\", \"Segoe UI\", Roboto, Oxygen-Sans, Ubuntu, Cantarell, \"Helvetica Neue\", sans-serif", "font-size": "28px", "font-weight": "700", "letter-spacing": "normal", "line-height": "42px", "text-align": "start", "text-transform": "none", "margin-top": "0px", "margin-right": "0px", "margin-bottom": "0px", "margin-left": "0px", "padding-top": "0px", "padding-right": "0px", "padding-bottom": "0px", "padding-left": "0px" }, "h2": { "color": "rgb(0, 0, 0)", "font-family": "-apple-system, \"system-ui\", \"Segoe UI\", Roboto, Oxygen-Sans, Ubuntu, Cantarell, \"Helvetica Neue\", sans-serif", "font-size": "21px", "font-weight": "700", "letter-spacing": "normal", "line-height": "31.5px", "text-align": "start", "text-transform": "none", "margin-top": "21px", "margin-right": "0px", "margin-bottom": "21px", "margin-left": "0px", "padding-top": "0px", "padding-right": "0px", "padding-bottom": "0px", "padding-left": "0px" }, "h3": { "color": "rgb(0, 0, 0)", "font-family": "-apple-system, \"system-ui\", \"Segoe UI\", Roboto, Oxygen-Sans, Ubuntu, Cantarell, \"Helvetica Neue\", sans-serif", "font-size": "16.38px", "font-weight": "700", "letter-spacing": "normal", "line-height": "24.57px", "text-align": "start", "text-transform": "none", "margin-top": "16.38px", "margin-right": "0px", "margin-bottom": "16.38px", "margin-left": "0px", "padding-top": "0px", "padding-right": "0px", "padding-bottom": "0px", "padding-left": "0px" }, "h4": { "color": "rgb(0, 0, 0)", "font-family": "-apple-system, \"system-ui\", \"Segoe UI\", Roboto, Oxygen-Sans, Ubuntu, Cantarell, \"Helvetica Neue\", sans-serif", "font-size": "14px", "font-weight": "700", "letter-spacing": "normal", "line-height": "21px", "text-align": "start", "text-transform": "none", "margin-top": "0px", "margin-right": "0px", "margin-bottom": "0px", "margin-left": "0px", "padding-top": "0px", "padding-right": "0px", "padding-bottom": "0px", "padding-left": "0px" }, "h5": { "color": "rgb(0, 0, 0)", "font-family": "-apple-system, \"system-ui\", \"Segoe UI\", Roboto, Oxygen-Sans, Ubuntu, Cantarell, \"Helvetica Neue\", sans-serif", "font-size": "14px", "font-weight": "700", "letter-spacing": "normal", "line-height": "15.4px", "text-align": "start", "text-transform": "none", "margin-top": "0px", "margin-right": "0px", "margin-bottom": "0px", "margin-left": "0px", "padding-top": "0px", "padding-right": "0px", "padding-bottom": "0px", "padding-left": "0px" }, "h6": { "color": "rgb(0, 0, 0)", "font-family": "-apple-system, \"system-ui\", \"Segoe UI\", Roboto, Oxygen-Sans, Ubuntu, Cantarell, \"Helvetica Neue\", sans-serif", "font-size": "14px", "font-weight": "400", "letter-spacing": "normal", "line-height": "21px", "text-align": "start", "text-transform": "none", "margin-top": "0px", "margin-right": "0px", "margin-bottom": "0px", "margin-left": "0px", "padding-top": "0px", "padding-right": "0px", "padding-bottom": "0px", "padding-left": "0px" }, "ol": { "color": "rgb(45, 45, 47)", "font-family": "Charter, Georgia, Times, \"Times New Roman\", serif", "font-size": "18px", "font-weight": "400", "letter-spacing": "normal", "line-height": "27px", "text-align": "start", "text-transform": "none", "margin-top": "18px", "margin-right": "0px", "margin-bottom": "18px", "margin-left": "18px", "padding-top": "0px", "padding-right": "0px", "padding-bottom": "0px", "padding-left": "0px" }, "ul": { "color": "rgb(45, 45, 47)", "font-family": "Charter, Georgia, Times, \"Times New Roman\", serif", "font-size": "18px", "font-weight": "400", "letter-spacing": "normal", "line-height": "27px", "text-align": "start", "text-transform": "none", "margin-top": "18px", "margin-right": "0px", "margin-bottom": "18px", "margin-left": "18px", "padding-top": "0px", "padding-right": "0px", "padding-bottom": "0px", "padding-left": "0px" }, "blockquote": { "color": "rgb(55, 63, 69)", "font-family": "\"open sans\", \"helvetica neue\", Helvetica, Arial, sans-serif", "font-size": "17.5px", "font-weight": "400", "letter-spacing": "normal", "line-height": "25px", "text-align": "start", "text-transform": "none", "margin-top": "17.5px", "margin-right": "0px", "margin-bottom": "17.5px", "margin-left": "0px", "padding-top": "10px", "padding-right": "20px", "padding-bottom": "10px", "padding-left": "20px" }, "a": { "color": "rgb(32, 177, 150)", "font-family": "\"open sans\", \"helvetica neue\", Helvetica, Arial, sans-serif", "font-size": "14px", "font-weight": "400", "letter-spacing": "normal", "line-height": "20px", "text-align": "start", "text-transform": "none", "margin-top": "0px", "margin-right": "0px", "margin-bottom": "0px", "margin-left": "0px", "padding-top": "0px", "padding-right": "0px", "padding-bottom": "0px", "padding-left": "0px" } } } ``` ```json JSON setting theme={null} { "type": "color", "name": "background_color", "label": "Background color", "required": true, // optional "help": "help text shown in tooltip to creator while editing", // optional "allow_transparent": true, // optional "dependencies": [ { "field": "dependent_field", "value": "dependent_value" //optional } ] // optional } ``` ```json Example response theme={null} { "settings": { "background_color": "#C8102E" // ...additional plugin settings } // ...plugin-specific additional data } ``` # Date picker Source: https://developers.kit.com/plugins/component-library/date-picker The date picker allows creators to select specific dates for time-sensitive content such as event announcements, promotional campaigns, or content scheduling. All dates are standardized and returned in UTC ISO8601 format to ensure consistent handling across different time zones and applications. example date picker ## Compatibility | Plugin type | Availability | Additional notes | | -------------- | ---------------------------- | ---------------- | | Content blocks | | | | Media source | | | ## Properties `date` - the type of the component A unique internal-only identifier that is posted to an app's plugin server to share values inputted by the creator Creator-facing identifier that is shown in the plugin environment Determines whether the creator must select a date before proceeding Brief creator-facing explanation that clarifies the component's purpose and usage. Allows for the field to be shown conditionally. Dependent on other fields. See [dependencies page](/plugins/component-library/dependencies) for more details. Name of the dependent field Value for the dependent field required to show this field. To show when any value is inputted, leave out this property. ```json JSON setting theme={null} { "type": "date", "name": "start_date", "label": "Start date", "required": false, // optional "help": "help text shown in tooltip to creator while editing", // optional "dependencies": [ { "field": "dependent_field", "value": "dependent_value" //optional } ] // optional } ``` ```json Example response theme={null} { "settings": { "start_date": "2024-10-03T07:00:00.000Z" // ...additional plugin settings } // ...plugin-specific additional data } ``` # Dependencies Source: https://developers.kit.com/plugins/component-library/dependencies Many Kit components support **dependencies** — a feature that conditionally displays customization options based on user interactions with other fields. This creates a more intuitive and contextual user experience by showing relevant options only when needed. ## Configuration To implement dependencies, add a `dependencies` property to your component's JSON configuration. This property accepts an array of objects that specify which fields must be interacted with before the current field becomes visible. In order for a field to show when any value is selected: ```json theme={null} { "name": "advancedOption", "type": "text", "dependencies": [ { "field": "basicOption" }, { "field": "secondDependency" } ] // ...additional component-specific settings } ``` ## Value-Specific Dependencies For more granular control, you can require specific values using a dependency object, with an additional specified value property. The dependent field will only appear when the specified field contains the exact value. ```json theme={null} { "name": "colorPicker", "type": "color", "dependencies": [ { "field": "customColor", "value": "custom" } ] // ...additional component-specific settings } ``` If you only want to show a component when a field has no value, you can specify the value as `null`: ```json theme={null} { "name": "colorPicker", "type": "color", "dependencies": [ { "field": "customColor", "value": null } ] // ...additional component-specific settings } ``` ## Component-Specific Behaviors While dependencies are widely supported, certain components have unique behaviors or limitations, examples can be found below: * **Toggle components**: Only trigger dependencies when set to `true` (on state) * **Some components**: May not support dependencies due to their functional design For detailed information about dependency support and special behaviors for each component type, refer to the individual component documentation pages. ## Best Practices * Use dependencies to progressively reveal complex options * Keep dependency chains simple and logical * Test all dependency scenarios to ensure expected behavior * Document any custom dependency logic for team members and add to your app's help centre article # Dynamic select input Source: https://developers.kit.com/plugins/component-library/dynamic-select-input The dynamic select input provides creators with a dropdown menu containing options fetched dynamically from your server. This component is specifically designed for filtering media gallery results in real-time. When a creator selects an option, it triggers a new request to refresh the media results based on the selected filter value. example dynamic select input Fields cannot be dependent on dynamic select inputs as they are only available for the media source, that has restricted component functionality. Check the [media source documentation](/plugins/media-source/plugin-settings) for more details. ## Compatibility | Plugin type | Availability | Additional notes | | -------------- | ---------------------------- | --------------------------------------------------------------------------------------------------------------------------------------------------------- | | Content blocks | | | | Media source | | Available as part of the preset `filter` group functionality. Check [media source documentation](/plugins/media-source/plugin-settings) for more details. | ## Request URL behaviour Kit makes POST requests to your `request_url` in the following scenarios: * **Initial load**: Request to populate the dropdown options when the plugin loads * **Filter selection**: Request with the selected value to return filtered media results Your endpoint should return an array of label-value pairs for the dropdown options: ```json theme={null} { "options": [ { "label": "Home", "value": "home" }, { "label": "Favorites", "value": "favorites" }, { "label": "Shared", "value": "shared" } ] } ``` ## Properties `dynamicSelect` - the type of the component A unique internal-only identifier that is posted to an app's plugin server to share values inputted by the creator Creator-facing identifier that is shown in the plugin environment The endpoint URL that Kit will call to fetch dynamic options and handle filter selections Determines whether the creator must make a selection before proceeding ```json JSON setting theme={null} { "type": "group", "name": "filter_group", "settings": [ { "type": "dynamicSelect", "label": "Folders", "name": "folder", "request_url": "https://example-plugin.com/folders", "required": false } ] } ``` ```json Example response theme={null} { "settings": { "folder": "favorites" // ...additional plugin settings } // ...plugin-specific additional data } ``` # Font picker Source: https://developers.kit.com/plugins/component-library/font-picker The font picker allows creators to select typography that matches their brand identity and enhances readability. It provides access to email-safe font families with their appropriate fallbacks, along with font weight options to create visual hierarchy and emphasis in email content. example font picker ## Compatibility | Plugin type | Availablity | Additional notes | | -------------- | ---------------------------- | ---------------- | | Content blocks | | | | Media source | | | ## Properties `fontFamily` - the type of the component A unique internal-only identifier that is posted to an app's plugin server to share values inputted by the creator Creator-facing identifier that is shown in the plugin environment Determines whether the creator must select a font before proceeding Brief creator-facing explanation that clarifies the component's purpose and usage. Allows for the field to be shown conditionally. dependent on other fields. See [dependencies page](/plugins/component-library/dependencies) for more details. Name of the dependent field Value for the dependent field required to show this field. To show when any value is inputted, leave out this property. ## Best practices ### Automatic styling When using the `font picker` for content blocks, alongside the settings object, Kit also shares data on the styles used within the email template - allowing your plugin to assume the styling of the email automatically, to make it feel as native as possible. Details on the style data available can be found below: * p * h1 * h2 * h3 * h4 * h5 * h6 * ol * ul * blockquote * a * "color", * "font-family", * "font-size", * "font-weight", * "letter-spacing", * "line-height", * "text-align", * "text-transform", * "margin-top", * "margin-right", * "margin-bottom", * "margin-left", * "padding-top", * "padding-right", * "padding-bottom", * "padding-left" ```json theme={null} { "settings": { "postId": "default-to-generosity-id-123", "favoriteColor": "#ff0000" }, "styles": { "p": { "color": "rgb(45, 45, 47)", "font-family": "Charter, Georgia, Times, \"Times New Roman\", serif", "font-size": "18px", "font-weight": "400", "letter-spacing": "normal", "line-height": "27px", "text-align": "start", "text-transform": "none", "margin-top": "18px", "margin-right": "0px", "margin-bottom": "18px", "margin-left": "0px", "padding-top": "0px", "padding-right": "0px", "padding-bottom": "0px", "padding-left": "0px" }, "h1": { "color": "rgb(0, 0, 0)", "font-family": "-apple-system, \"system-ui\", \"Segoe UI\", Roboto, Oxygen-Sans, Ubuntu, Cantarell, \"Helvetica Neue\", sans-serif", "font-size": "28px", "font-weight": "700", "letter-spacing": "normal", "line-height": "42px", "text-align": "start", "text-transform": "none", "margin-top": "0px", "margin-right": "0px", "margin-bottom": "0px", "margin-left": "0px", "padding-top": "0px", "padding-right": "0px", "padding-bottom": "0px", "padding-left": "0px" }, "h2": { "color": "rgb(0, 0, 0)", "font-family": "-apple-system, \"system-ui\", \"Segoe UI\", Roboto, Oxygen-Sans, Ubuntu, Cantarell, \"Helvetica Neue\", sans-serif", "font-size": "21px", "font-weight": "700", "letter-spacing": "normal", "line-height": "31.5px", "text-align": "start", "text-transform": "none", "margin-top": "21px", "margin-right": "0px", "margin-bottom": "21px", "margin-left": "0px", "padding-top": "0px", "padding-right": "0px", "padding-bottom": "0px", "padding-left": "0px" }, "h3": { "color": "rgb(0, 0, 0)", "font-family": "-apple-system, \"system-ui\", \"Segoe UI\", Roboto, Oxygen-Sans, Ubuntu, Cantarell, \"Helvetica Neue\", sans-serif", "font-size": "16.38px", "font-weight": "700", "letter-spacing": "normal", "line-height": "24.57px", "text-align": "start", "text-transform": "none", "margin-top": "16.38px", "margin-right": "0px", "margin-bottom": "16.38px", "margin-left": "0px", "padding-top": "0px", "padding-right": "0px", "padding-bottom": "0px", "padding-left": "0px" }, "h4": { "color": "rgb(0, 0, 0)", "font-family": "-apple-system, \"system-ui\", \"Segoe UI\", Roboto, Oxygen-Sans, Ubuntu, Cantarell, \"Helvetica Neue\", sans-serif", "font-size": "14px", "font-weight": "700", "letter-spacing": "normal", "line-height": "21px", "text-align": "start", "text-transform": "none", "margin-top": "0px", "margin-right": "0px", "margin-bottom": "0px", "margin-left": "0px", "padding-top": "0px", "padding-right": "0px", "padding-bottom": "0px", "padding-left": "0px" }, "h5": { "color": "rgb(0, 0, 0)", "font-family": "-apple-system, \"system-ui\", \"Segoe UI\", Roboto, Oxygen-Sans, Ubuntu, Cantarell, \"Helvetica Neue\", sans-serif", "font-size": "14px", "font-weight": "700", "letter-spacing": "normal", "line-height": "15.4px", "text-align": "start", "text-transform": "none", "margin-top": "0px", "margin-right": "0px", "margin-bottom": "0px", "margin-left": "0px", "padding-top": "0px", "padding-right": "0px", "padding-bottom": "0px", "padding-left": "0px" }, "h6": { "color": "rgb(0, 0, 0)", "font-family": "-apple-system, \"system-ui\", \"Segoe UI\", Roboto, Oxygen-Sans, Ubuntu, Cantarell, \"Helvetica Neue\", sans-serif", "font-size": "14px", "font-weight": "400", "letter-spacing": "normal", "line-height": "21px", "text-align": "start", "text-transform": "none", "margin-top": "0px", "margin-right": "0px", "margin-bottom": "0px", "margin-left": "0px", "padding-top": "0px", "padding-right": "0px", "padding-bottom": "0px", "padding-left": "0px" }, "ol": { "color": "rgb(45, 45, 47)", "font-family": "Charter, Georgia, Times, \"Times New Roman\", serif", "font-size": "18px", "font-weight": "400", "letter-spacing": "normal", "line-height": "27px", "text-align": "start", "text-transform": "none", "margin-top": "18px", "margin-right": "0px", "margin-bottom": "18px", "margin-left": "18px", "padding-top": "0px", "padding-right": "0px", "padding-bottom": "0px", "padding-left": "0px" }, "ul": { "color": "rgb(45, 45, 47)", "font-family": "Charter, Georgia, Times, \"Times New Roman\", serif", "font-size": "18px", "font-weight": "400", "letter-spacing": "normal", "line-height": "27px", "text-align": "start", "text-transform": "none", "margin-top": "18px", "margin-right": "0px", "margin-bottom": "18px", "margin-left": "18px", "padding-top": "0px", "padding-right": "0px", "padding-bottom": "0px", "padding-left": "0px" }, "blockquote": { "color": "rgb(55, 63, 69)", "font-family": "\"open sans\", \"helvetica neue\", Helvetica, Arial, sans-serif", "font-size": "17.5px", "font-weight": "400", "letter-spacing": "normal", "line-height": "25px", "text-align": "start", "text-transform": "none", "margin-top": "17.5px", "margin-right": "0px", "margin-bottom": "17.5px", "margin-left": "0px", "padding-top": "10px", "padding-right": "20px", "padding-bottom": "10px", "padding-left": "20px" }, "a": { "color": "rgb(32, 177, 150)", "font-family": "\"open sans\", \"helvetica neue\", Helvetica, Arial, sans-serif", "font-size": "14px", "font-weight": "400", "letter-spacing": "normal", "line-height": "20px", "text-align": "start", "text-transform": "none", "margin-top": "0px", "margin-right": "0px", "margin-bottom": "0px", "margin-left": "0px", "padding-top": "0px", "padding-right": "0px", "padding-bottom": "0px", "padding-left": "0px" } } } ``` ```json JSON setting theme={null} { "type": "fontFamily", "name": "paragraph_font", "label": "Paragraph font", "required": true, // optional "help": "help text shown in tooltip to creator while editing", // optional "dependencies": [ { "field": "dependent_field", "value": "dependent_value" //optional } ] // optional } ``` ```json Example response theme={null} { "settings": { "paragraph_font": { "fontFamily": "'Courier New', Courier, monospace", "fontWeight": 400 } // ...additional plugin settings } // ...plugin-specific additional data } ``` # Group Source: https://developers.kit.com/plugins/component-library/group The group component provides a collapsible organizational structure for grouping related plugin settings together. It creates an expandable/collapsible section with a clear label and optional help text, making it easy for app developers to manage complex plugin configurations by organizing them into logical groups. The component allows for better user experience when dealing with plugins that have many settings. example group setting ## Compatibility | Plugin type | Availability | Additional notes | | -------------- | ---------------------------- | --------------------------------------------------------------------------------------------------------------------------------------------------- | | Content blocks | | | | Media source | | Available as part of the preset `search` functionality. Check [media source documentation](/plugins/media-source/plugin-settings) for more details. | ## Properties `group` - the type of the component Creator-facing identifier that is shown as the group header in the plugin environment Array of child setting objects that will be displayed within the collapsed group. Each setting should be a valid plugin setting component. Brief creator-facing explanation that clarifies the group's purpose and usage, displayed as a tooltip next to the group label Allows for the group to be shown conditionally, dependent on other fields. See [dependencies page](/plugins/component-library/dependencies) for more details. Name of the dependent field Value for the dependent field required to show this group. To show when any value is inputted, leave out this property. ## Testing Examples ### Simple Group (Copy & Paste Ready) ```json theme={null} { "type": "group", "label": "Basic Settings", "name": "basic_settings", "settings": [ { "type": "text", "name": "title", "label": "Title" }, { "type": "text", "name": "description", "label": "Description" } ] } ``` ### Group with Help Text ```json theme={null} { "type": "group", "label": "Advanced Settings", "name": "basic_settings", "help": "Configure advanced options here", "settings": [ { "type": "text", "name": "api_key", "label": "API Key", "placeholder": "Enter your API key" }, { "type": "select", "name": "timeout", "label": "Timeout", "options": [ { "label": "5 seconds", "value": "5" }, { "label": "10 seconds", "value": "10" } ] } ] } ``` ### Group with Dependencies ```json theme={null} { "type": "group", "label": "Optional Features", "name": "basic_settings", "settings": [ { "type": "text", "name": "webhook_url", "label": "Webhook URL" } ], "dependencies": [ { "field": "enable_webhooks", "value": "true" } ] } ``` ```json Example response theme={null} { "settings": { "title": "My Plugin Title", "description": "Plugin description here", "api_key": "abc123xyz", "timeout": "10", "webhook_url": "https://example.com/webhook" } } ``` # Numerical input Source: https://developers.kit.com/plugins/component-library/numerical-input The numerical input allows creators to enter numeric values in a dedicated field with optional currency or unit indicators. It's perfect for collecting prices, quantities, measurements, or any numeric data that benefits from contextual prefixes or suffixes. The input provides a clean interface optimized for numerical data entry. example numerical input ## Compatibility | Plugin type | Availability | Additional notes | | -------------- | ---------------------------- | ---------------- | | Content blocks | | | | Media source | | | ## Properties `numericalInput` - the type of the component A unique internal-only identifier that is posted to an app's plugin server to share values inputted by the creator Creator-facing identifier that is shown in the plugin environment Text or symbol displayed before the input field (e.g., "\$" for currency). Maximum 5 characters. Cannot be used with `append`. Text or symbol displayed after the input field (e.g., "lbs" for weight). Maximum 5 characters. Cannot be used with `prepend`. Maximum value allowed Minimum value allowed Determines whether the creator must enter a value before proceeding Brief creator-facing explanation that clarifies the component's purpose and usage. Maximum 64 characters. Allows for the field to be shown conditionally. dependent on other fields. See [dependencies page](/plugins/component-library/dependencies) for more details. Name of the dependent field Value for the dependent field required to show this field. To show when any value is inputted, leave out this property. ## Important Notes * Either `prepend` or `append` must be provided, but not both * The placeholder is automatically set to "0" and cannot be customized * Input accepts decimal numbers and automatically validates numeric format ```json JSON setting with prepend theme={null} { "type": "numericalInput", "name": "price", "label": "Product Price", "prepend": "$", "max": 200, //optional "min": 0, //optional "required": true, "help": "Enter the price in USD", "dependencies": [ { "field": "enable_pricing", "value": true } ] } ``` ```json Example response theme={null} { "settings": { "price": "99.99", "weight": "2.5" } } ``` # Overview Source: https://developers.kit.com/plugins/component-library/overview Plugin components are the configurable UI elements that creators use to customize their plugins' behavior and appearance in Kit's different plugin environments. These reusable settings are defined in your plugin's JSON configuration and appear when creators interact with your plugin, allowing them to personalize the content and functionality before it's added to their Kit. The color picker lets creators customize colors for backgrounds, buttons, text and more to match their brand and email templates. The date picker lets creators select specific dates for time-sensitive content like events or promotions, with dates returned in standardized UTC format. The dynamic select provides creators with a dropdown of server-fetched options to filter media gallery results in real-time. The font picker lets creators select email-safe fonts and weights to match their brand and improve readability. The group component allows creators to organize settings into collapsible sections for better clarity in complex plugin configurations. The numerical input lets creators enter numeric values with optional currency or unit indicators. The radio group lets creators choose from mutually exclusive options like alignment or layout modes through selectable buttons. The search input lets creators search and select dynamic content from external sources with real-time functionality, supporting single or multiple selections. The select input provides creators with a dropdown of predefined options like categories or sizes, with the selected value passed to your plugin. The slider lets creators select numerical values for properties like dimensions or quantities through a visual slider or direct input for precision. The textarea lets creators enter multi-line text content like descriptions or messages in an expandable interface. The text input lets creators enter short text like titles, names, or URLs in a single-line field. The toggle lets creators enable or disable features through a simple on/off switch with clear visual feedback. # Radio group Source: https://developers.kit.com/plugins/component-library/radio-group The radio group component allows creators to choose from mutually exclusive options presented as individual selectable buttons. It's ideal for settings where only one choice can be made at a time, such as text alignment, layout options, or display modes. The visual button interface makes selection clear and intuitive for creators. example radio button To get the most out of dependency with radio-groups utilize the `value` option whereby a field only shows when the corresponding value is selected, using the following syntax: ```json theme={null} { "name": "text_alignment", "label": "Text Alignment", "type": "radioGroup", // ...additional component-specific settings "dependencies": [ { "field": "field_name", "value": "expected_value" } ] } ``` A typical use case for this would be to create three pre-defined options and a final `Custom` button, that exposes more granular functionality. ## Compatibility | Plugin type | Availability | Additional notes | | -------------- | ---------------------------- | ---------------- | | Content blocks | | | | Media source | | | ## Properties `radioGroup` - the type of the component A unique internal-only identifier that is posted to an app's plugin server to share values inputted by the creator Creator-facing identifier that is shown in the plugin environment (64 character limit) Array of objects containing label-value pairs for the radio button options A unique internal-only identifier that is posted to an app's plugin server to share values from the specific button selected by the creator Creator-facing identifier that is shown on the button (character length across all labels in the component cannot exceed 28 characters) Default option value that is pre-selected when the component first loads Determines whether the creator must make a selection before proceeding (defaults to false) Brief creator-facing explanation that clarifies the component's purpose and usage (64 character limit) Allows for the field to be shown conditionally. dependent on other fields. See [dependencies page](/plugins/component-library/dependencies) for more details. Name of the dependent field Value for the dependent field required to show this field. To show when any value is inputted, leave out this property. ```json JSON setting theme={null} { "name": "text_alignment", "label": "Text Alignment", "required": false, // optional - defaults to false "help": "Choose how text should be aligned", // optional "type": "radioGroup", "default": "left", // optional "options": [ { "label": "Left", "value": "left" }, { "label": "Center", "value": "center" }, { "label": "Right", "value": "right" } ], "dependencies": [ { "field": "dependent_field", "value": "dependent_value" //optional } ] // optional } ``` ```json Example response theme={null} { "settings": { "radio_group": "center" // ...additional plugin settings } // ...plugin-specific additional data } ``` # Search input Source: https://developers.kit.com/plugins/component-library/search-input The search input allows creators to search and select from dynamic content sourced from external APIs or databases. It provides real-time search functionality with debounced requests, supports dependencies on other form inputs, and can handle both single and multiple selections. This component is ideal for selecting blog posts, products, categories, or any searchable content. example search input ## Compatibility | Plugin type | Availablity | Additional notes | | -------------- | ---------------------------- | ---------------- | | Content blocks | | | | Media source | | | ## Request URL behaviour The behaviour of the `request_url` property is specific to the plugin environment in which it is used. The sections below outline the differences between plugin environments: * **Initial load**: When a creator adds a content block, Kit makes a request with an empty search parameter to populate default results * **User typing**: Debounced request made by Kit with the user's search query * **Draft restoration**: If a creator leaves their email in a draft state and edits again in the future, we’ll make a request to your provided request\_url with the value of the option they had previously selected. This allows us to fill the dropdown with your user-friendly label. Your endpoint should return an array of label-value pairs: ```json theme={null} { "data": [ { "label": "A post title", "value": "post-id-123" } ] } ``` For error handling, include an errors array: ```json theme={null} { "data": [], "errors": ["Plan not found"] } ``` COMING SOON ## Properties `search` - the type of the component A unique internal-only identifier that is posted to an app's plugin server to share values inputted by the creator Creator-facing identifier that is shown in the plugin environment The endpoint URL that Kit will call to fetch search results Placeholder text displayed in the search input field Determines whether the creator must make a selection before proceeding Brief creator-facing explanation that clarifies the component's purpose and usage Allows for the field to be shown conditionally. dependent on other fields. See [dependencies page](/plugins/component-library/dependencies) for more details. We maintain backwards compatibility for string arrays but recommend using the object format going forwards. Name of the dependent field Value for the dependent field required to show this field. To show when any value is inputted, leave out this property. Enables multiple selection when set to true ## Best practices * Ensure the initial empty state is handled, offering default options when no input is given * Use a sensible sort order for your data - for example alphabetical, most recently created or most popular * Ensure labels are clear, short and unique so that creators know exactly what they are selecting ```json JSON setting theme={null} { "type": "search", "name": "post", "label": "Post", "request_url": "https://example.com/path/to/your/search/endpoint", "placeholder": "Select a post", // optional "required": true, // optional "help": "help text shown in tooltip to creator while editing", // optional "multiselect": false, // optional "dependencies": [ { "field": "dependent_field", "value": "dependent_value" //optional } ] // optional } ``` ```json Example response (single select) theme={null} { "settings": { "post": "post-id-123" // ...additional plugin settings } // ...plugin-specific additional data } ``` ```json (multiple select) theme={null} { "settings": { "post": ["post-id-123", "post-id-456"] // ...additional plugin settings } // ...plugin-specific additional data } ``` # Select input Source: https://developers.kit.com/plugins/component-library/select-input The select input provides creators with a dropdown menu containing predefined options. It's ideal for scenarios where you need to present a fixed set of choices such as categories, sizes, or configuration options. The selected value is hidden from creators but passed to your plugin for processing. If you want to generate dynamic options, please use a [search input](/plugins/component-library/search-input) instead. example select input ## Compatibility | Plugin type | Availability | Additional notes | | -------------- | ---------------------------- | -------------------------------------------------------------------------------------------------------------------------------------------------------------------- | | Content blocks | | | | Media source | | Available as part of the preset `filter` and `sort` group functionality. Check [media source documentation](/plugins/media-source/plugin-settings) for more details. | ## Properties `select` - the type of the component A unique internal-only identifier that is posted to an app's plugin server to share values inputted by the creator Creator-facing identifier that is shown in the plugin environment Array of objects containing label-value pairs for the dropdown options Placeholder text displayed when no option is selected Determines whether the creator must make a selection before proceeding Brief creator-facing explanation that clarifies the component's purpose and usage Allows for the field to be shown conditionally. dependent on other fields. See [dependencies page](/plugins/component-library/dependencies) for more details. Name of the dependent field Value for the dependent field required to show this field. To show when any value is inputted, leave out this property. ```json JSON setting theme={null} { "type": "select", "name": "favorite_food", "label": "Favorite food", "options": [ { "label": "French fries", "value": "food-id-1" }, { "label": "Hash browns", "value": "food-id-2" }, { "label": "Potato chips", "value": "food-id-3" } ], "placeholder": "Select a food...", // optional "required": true, // optional "help": "help text shown in tooltip to creator while editing", // optional "dependencies": [ { "field": "dependent_field", "value": "dependent_value" //optional } ] // optional } ``` ```json Example response theme={null} { "settings": { "favorite_food": "food-id-2" // ...additional plugin settings } // ...plugin-specific additional data } ``` # Slider Source: https://developers.kit.com/plugins/component-library/slider The slider provides creators with an intuitive way to select numerical values through a visual slider interface combined with a numerical input box. It's perfect for precise control over design properties like corner radius, border width, pixel dimensions, or quantities. The dual interface allows creators to either drag the slider for quick adjustments or type exact values for precision. example slider Fields cannot be dependent on sliders as they always have a value. ## Compatibility | Plugin type | Availability | Additional notes | | -------------- | ---------------------------- | ---------------- | | Content blocks | | | | Media source | | | ## Properties `slider` - the type of the component A unique internal-only identifier that is posted to an app's plugin server to share values inputted by the creator Creator-facing identifier that is shown in the plugin environment (64 character limit) Maximum value allowed on the slider Minimum value allowed on the slider Increment value for slider movement and input validation Default value when the component first loads Determines whether the creator must set a value before proceeding, defaults to `false` Brief creator-facing explanation that clarifies the component's purpose and usage (64 character limit) Unit or label displayed after the value (3 character limit, defaults to null). If `null` or absent, the suffix won't show Allows for the field to be shown conditionally. dependent on other fields. See [dependencies page](/plugins/component-library/dependencies) for more details. Name of the dependent field Value for the dependent field required to show this field. To show when any value is inputted, leave out this property. ```json JSON setting theme={null} { "name": "border_width", "label": "Border Width", "required": false, // optional "help": "Set the border width in pixels", // optional "type": "slider", "max": 20, "min": 0, "step": 1, "default": 2, "suffix": "px", // optional "dependencies": [ { "field": "dependent_field", "value": "dependent_value" //optional } ] // optional } ``` ```json Example response theme={null} { "settings": { "border_width": 5 // ...additional plugin settings } // ...plugin-specific additional data } ``` # Text input Source: https://developers.kit.com/plugins/component-library/text-input The text input allows creators to enter short snippets of text in a single-line field. It's perfect for collecting titles, names, URLs, or any brief text content that doesn't require multiple lines. The input provides a clean, straightforward interface for essential text-based information. example text input ## Compatibility | Plugin type | Availability | Additional notes | | -------------- | ---------------------------- | --------------------------------------------------------------------------------------------------------------------------------------------------- | | Content blocks | | | | Media source | | Available as part of the preset `search` functionality. Check [media source documentation](/plugins/media-source/plugin-settings) for more details. | ## Properties `text` - the type of the component A unique internal-only identifier that is posted to an app's plugin server to share values inputted by the creator Creator-facing identifier that is shown in the plugin environment Placeholder text displayed in the input field when empty Determines whether the creator must enter text before proceeding Brief creator-facing explanation that clarifies the component's purpose and usage Allows for the field to be shown conditionally. dependent on other fields. See [dependencies page](/plugins/component-library/dependencies) for more details. Name of the dependent field Value for the dependent field required to show this field. To show when any value is inputted, leave out this property. ```json JSON setting theme={null} { "type": "text", "name": "title", "label": "Title", "placeholder": "Enter a title...", // optional "required": true, // optional "help": "help text shown in tooltip to creator while editing", // optional "dependencies": [ { "field": "dependent_field", "value": "dependent_value" //optional } ] // optional } ``` ```json Example response theme={null} { "settings": { "title": "My Amazing Email Campaign" // ...additional plugin settings } // ...plugin-specific additional data } ``` # Textarea Source: https://developers.kit.com/plugins/component-library/textarea The textarea component allows creators to enter longer, multi-line text content. It's ideal for collecting descriptions, messages, body content, or any text that requires multiple lines and more space than a single-line input. The textarea provides an expandable interface that accommodates extensive text-based information. example textarea ## Compatibility | Plugin type | Availability | Additional notes | | -------------- | ---------------------------- | --------------------------------------------------------------------------------------------------------------------------------------------------- | | Content blocks | | | | Media source | | Available as part of the preset `search` functionality. Check [media source documentation](/plugins/media-source/plugin-settings) for more details. | ## Properties `textarea` - the type of the component A unique internal-only identifier that is posted to an app's plugin server to share values inputted by the creator Creator-facing identifier that is shown in the plugin environment (64 character limit) Placeholder text displayed in the textarea when empty Default value when the component first loads Maximum character limit for the textarea content. Set to `null` for unlimited length Determines whether the creator must enter text before proceeding Brief creator-facing explanation that clarifies the component's purpose and usage (64 character limit) Allows for the field to be shown conditionally, dependent on other fields. See [dependencies page](/plugins/component-library/dependencies) for more details. Name of the dependent field Value for the dependent field required to show this field. To show when any value is inputted, leave out this property. ```json JSON setting theme={null} { "type": "textarea", "name": "feature_description", "label": "Feature Description", "placeholder": "Describe the feature when enabled", // optional "default": "This text describes the feature", // optional "max_length": null, // optional - null for unlimited "required": false, // optional "help": "Only appears when feature toggle is enabled", // optional "dependencies": [ { "field": "enable_feature" // no value property - shows when enable_feature has any value } ] // optional } ``` ```json Example response theme={null} { "settings": { "feature_description": "This feature enables advanced analytics tracking for user interactions, providing detailed insights into engagement patterns and conversion metrics. It includes real-time monitoring, custom event tracking, and comprehensive reporting dashboards." // ...additional plugin settings } // ...plugin-specific additional data } ``` # Toggle Source: https://developers.kit.com/plugins/component-library/toggle The toggle allows creators to enable or disable specific features through a simple boolean switch interface. It's perfect for optional configurations like custom descriptions, showing or hiding elements, applying filters, or turning functionality on and off. The toggle provides clear visual feedback about the current state of the setting. example toggle Fields dependent on toggles will only show when the toggle is switched on (i.e. has a value `true`). ## Compatibility | Plugin type | Availability | Additional notes | | -------------- | ---------------------------- | ---------------- | | Content blocks | | | | Media source | | | ## Properties `toggle` - the type of the component A unique internal-only identifier that is posted to an app's plugin server to share values inputted by the creator Creator-facing identifier that is shown in the plugin environment (64 character limit) Default state of the toggle when the component first loads Determines whether the creator must interact with the toggle before proceeding Brief creator-facing explanation that clarifies the component's purpose and usage (64 character limit) Allows for the field to be shown conditionally. dependent on other fields. See [dependencies page](/plugins/component-library/dependencies) for more details. Name of the dependent field Value for the dependent field required to show this field. To show when any value is inputted, leave out this property. ```json JSON setting theme={null} { "type": "toggle", "name": "optional_toggle", "label": "Optional Toggle", "default": false, // optional "required": false, // optional "help": "Helping you understand what this toggle does", //optional "dependencies": [ { "field": "dependent_field", "value": "dependent_value" //optional } ] // optional } ``` ```json Example response theme={null} { "settings": { "optional_toggle": true // ...additional plugin settings } // ...plugin-specific additional data } ``` # Example content block plugin Source: https://developers.kit.com/plugins/content-blocks/example-plugin Simple example content block plugin Example OAuth authenticated content block plugin # Content blocks overview Source: https://developers.kit.com/plugins/content-blocks/overview Introducing content block plugins This functionality allows you to add your own elements to Kit's editor. The content of these elements are generated by endpoints on your server. You can submit your app to the Kit App Store for approval so your plugins can be used by other creators. To get started, first sign into our app and visit the [Build tab on the Kit App Store](https://app.kit.com/apps?is=created) to create your app, configure your plugin access, and create your plugins. Each plugin will appear as an item under your apps's name in our editor’s element menu. For more details on setting up apps and plugins, visit our [app](/kit-app-store/building-apps) and [plugin](/plugins/managing-plugins) building guides. # Content blocks plugin configuration Source: https://developers.kit.com/plugins/content-blocks/plugin-configuration Setting up your content block plugins Kit's content block plugins let you extend our email editor with custom HTML elements. This guide walks you through configuring your plugin's appearance, behavior, and settings—from naming and visual presentation to backend functionality and user controls. content block insertion menu content block configuration ## Name The plugin `name` is the user-facing name for your block. In the content block insertion menu example above, “Post”, and “Product” are `names`. It will appear in the editor’s element menu, and also in the breadcrumbs at the top of the sidebar when your block is selected. Your `name` should be short, ideally one or two words. ## Description The `description` is a short phrase describing your block. It will appear underneath the name in the element menu. In the example above, “Add a link to a post” and “Add a link to a product”. ## Sort order If you offer multiple elements, the `sort order` determines their placement. In the example above, “Post” has a `sort order` of `0`, while “Product” has a `sort order` of `1`. ## Icon The `icon` is an image for the node to be displayed alongside the `name` and the `description`. A monochrome SVG is recommended. PNG, GIF, JPEG extensions are also supported. The recommended size is 150x120px. ## Request URL The `Request URL` is the URL of an endpoint on your server that returns an HTML string. This endpoint’s job is to generate the HTML for your element to be rendered in the email editor. You’ll generate this HTML based on the settings you’ve defined for your block (outlined in the [plugin settings page](/plugins/content-blocks/plugin-settings)). Once a user completes all required settings, we’ll make a POST request to your `Request URL`. The request will contain a `settings` object with the user’s selected values for each of your settings: ```json theme={null} { "settings": { // The exact data in this section depends on how you've configured your // plugin's JSON settings (see next section). "title": "My title", "description": "My description" } } ``` Your endpoint should return HTML for the element: ```html theme={null}

{{ settings.title }}

{{ settings.description }}

``` Your `Request URL` should respond to this request with a JSON object containing an `html` key: ```json theme={null} { "code": 200, "html": "
...your HTML...
" } ``` Or, if you've encountered an error, return an object containing an `errors` array of strings. You may add as many errors to this array as you’d like: ```json theme={null} { "code": 404, "errors": ["Plan not found"] } ``` ## Settings JSON This field allows you to configure the sidebar settings for your element. It should be an array of objects; one object for each setting. For instance, this would be the JSON configuration for a plugin with two settings: “Title” and “Color”. ```json theme={null} [ { "type": "text", "name": "title", "label": "Title", "placeholder": "Enter a title...", "required": true }, { "type": "color", "name": "title_color", "label": "Color", "required": true } ] ``` Each setting’s `type` determines the UI rendered (such as a text input or a color picker); all available options are listed under the [plugin settings page](/plugins/content-blocks/plugin-settings). The `name` for each setting is used as the key in your HTML request: How settings JSON maps to the HTML request When you save your plugin, we’ll validate your JSON settings - which can be pre-emptively validated [using the JSON schema validator linked here](https://www.jsonschemavalidator.net/s/ovDMo04X). # Content blocks plugin flow Source: https://developers.kit.com/plugins/content-blocks/plugin-flow Example flow for the content block plugin Let’s say you were developing an integration that allowed users to embed “Products” from your app inside the Kit editor. The full flow would look like this: You create a POST endpoint on your server to generate the HTML for your Product embed. *Details on configuring the `HMTL URL` [can be found here](/plugins/content-blocks/plugin-configuration#html-url).* *Optional* - You create a POST endpoint on your server to allow users to search for products. This is only necessary if you add a [search input](/plugins/content-blocks/plugin-settings#search-input), because we need to retrieve the results from somewhere. You [create your app within Kit](https://app.kit.com/apps?is=created) and configure the Products plugin. Once your app and plugin are ready, you submit your app for approval and publish. A Kit user installs your app, triggering and completing your plugin's OAuth authentication flow. The Kit user navigates to an email and searches for your Product plugin from the content block menu, or by using the `/Products` quick command. They select it from the menu to add it. Upon adding the plugin to the email, and upon all subsequent interactions with the plugin settings, Kit will make a request to the endpoint found in step 1 along with the values from the configuration settings selected by the creator - along with their access tokens to ensure authentication with your servers. You will respond to the request, returning HTML for the Product that adheres to all of the setting values selected by the creator - which we'll insert into our editor, ready to send. # Content blocks plugin recommendations Source: https://developers.kit.com/plugins/content-blocks/plugin-recommendations Best practices, tips and tricks to get the most out of content block plugins * For email client compatibility, we suggest that you use inline `style` attributes such as `
` instead of CSS classes. * To test email client compatibility, we recommend using [https://www.caniemail.com](https://www.caniemail.com) and [https://www.litmus.com/](https://www.litmus.com/) * The only exception to this is if you need to include media queries to make your elements responsive on mobile, for example: ```html theme={null}
...
``` * Include `target=_blank` to all links * Use the full path URL for all links to ensure they can be opened * In most cases, you shouldn’t apply a background color to your plugin (unless the user is able to customize it). This is because the user might be using a custom background color on their email. By not applying a background color, your element’s background will automatically be the same as their email. # Plugin security Source: https://developers.kit.com/plugins/content-blocks/plugin-security Security for your content block plugins When we receive an HTML string from your server, we will [sanitize it](https://cheatsheetseries.owasp.org/cheatsheets/Cross_Site_Scripting_Prevention_Cheat_Sheet.html) to conform with recommended security practices. That means we’ll reject your HTML response if it includes any of the following: * Scripts, iframes * Audio, video elements * Form, input, command, action, prompt elements * External CSS styles, and CSS URLs # Content blocks plugin settings Source: https://developers.kit.com/plugins/content-blocks/plugin-settings Sidebar settings components This guide explains all of the sidebar settings components that are available to be used in your plugin's [settings JSON](/plugins/content-blocks/plugin-configuration#settings-json) configuration, giving your app users the ability to select and customize the HTML content they want to add into their email content. sidebar configuration example ## Compatible settings components * [Color picker](/plugins/component-library/color-picker) * [Date picker](/plugins/component-library/date-picker) * [Font picker](/plugins/component-library/font-picker) * [Group](/plugins/component-library/group) * [Numerical input](/plugins/component-library/numerical-input) * [Radio group](/plugins/component-library/radio-group) * [Search input](/plugins/component-library/search-input) * [Select input](/plugins/component-library/select-input) * [Slider](/plugins/component-library/slider) * [Textarea](/plugins/component-library/textarea) * [Text input](/plugins/component-library/text-input) * [Toggle](/plugins/component-library/toggle) ## Refreshing data After a user has configured all required settings, we will perform a request to your server for the block's HTML. If the user wants to refresh the data, they can either: 1. Click the refresh button that appears when hovering over the element (pictured below), or 2. Change one of your plugin’s settings in the sidebar, which will automatically kick off another request for new HTML. refresh plugin data # Managing plugins Source: https://developers.kit.com/plugins/managing-plugins Creating and configuring your app's plugins This guide helps you through the process of managing your plugins, from starting out, to testing all the way through to release. This guide is split out to help guide you through a number of key concepts: * Creating your plugins * Configuring plugin authentication * Testing your plugins * Activating your plugins * Managing your existing plugins ## Configuring plugin authentication Before you can start creating plugins, you need to select and set up your authorization strategy for your plugins to let Kit know how to fetch the content needed to let creators use your apps. We currently offer 2 options: If you require linking of third-party accounts or are sharing sensitive information, we currently only support OAuth authentication. This option will likely be the default for most applications, needing to pull data from a third-party account for the creator in a vast number of use cases. More details on OAuth authorization for plugins can be found in the [dedicated OAuth guide](/plugins/oauth-authorization). If you are working with public APIs, don’t need to pull any confidential information and are happy to have the content endpoints open, you can select “No authorization”. This can also be used temporarily to test our functionality before committing development time into building out an OAuth flow. plugin authentication strategies If you try to create a plugin without setting your authentication strategy, you will be prompted to set this up, with 2 options; selecting: * "Continue without authentication" sets your strategy to "No authorization", or * "Configure Authentication" takes you to the Authentication tab to set this up plugin authentication modal If you disable plugin authentication on the Authentication tab, you'll see a warning when you return to the Plugins tab. This warning indicates that you need to update authentication settings before your plugins can be active. Click the prompt to go directly to the Authentication tab and make the necessary changes.
disabled plugin authentication modal
## Create a new plugin Once you have selected your authentication method, you'll be able to create your first plugin! To do this, click on the "Plugins" tab in the sidebar menu when editing your app. When here, click on the "+ New plugin" button to start the process. creating your first plugin If this is your second app, the "+ New plugin" button will be located to the right of the Plugin title:
creating your first plugin
From here, a modal will appear asking for a name and plugin type. The name can be updated later and should be unique for the app you are creating. On overview for the available plugin types [can be found here](/plugins/overview), with more detail found in their dedicated sections in the Environments section below. OAuth authorization strategy UI After completing this step, you'll land on a dedicated setup page where you can configure your plugin settings. example plugin configuration Details on the JSON required to set plugins up can be found in the plugin configuration documentation for the respective plugin environment. ## Testing your plugins So that new plugins can be tested for apps that have already been published, the developer account for an app is able to see all plugins set up for an app within their account *regardless of whether they are active or not*. This allows you to utilize your production system and your app authentication to test changes in a live system without worrying about other accounts accessing your plugins before they are ready. If you haven't yet gone live with your app and you want to envision what your plugins will look like for creators, you can start building out your plugins with public API endpoints and the "no authorization" authentication strategy, allowing you to tweak your content before finalising your OAuth authentication flows. ## Activating your plugin When you first create your plugin it will be inactive. While inactive it will only be available to test for your developer account, but once activated, the plugin will be visible to any user who has installed the app. You must install your app from the Kit App Store to see your plugins in the editor. To do this, go to the ["Build" tab in the Kit App Store](https://app.kit.com/apps?is=created), click on "Preview" and install your app. In order to activate your plugin for Kit-wide usage, simply click the "Active" toggle and confirm that you want to set it live by clicking "Activate" in the resulting modal. activating your pluginactivating-your-plugin At this point, the plugin will be available for all accounts that have installed your app. ## Managing your plugins Once you have created plugins within your app, you'll see your complete plugin list in the "Plugin" tab of your app, with options to: * Activate or deactivate plugins using toggles * Edit plugin settings plugin list If a plugin is already active on a published app, we don’t recommend editing it until your changes have been thouroughly tested, as all updates to your plugins will take effect immediately, for accounts that have your app installed. Instead, create a new plugin and keep it inactive to test your changes. Once your tests are successful, you can update the original plugin with the new functionality. ### Deleting plugins You can also delete your unwanted plugins. In order to do this, simply edit the plugin you want to delete, and select the `Delete Plugin` button in the bottom left corner. delete plugin Once you click this, a confirmation modal will appear, click `Delete` and the plugin will be deleted from the app. delete plugin confirmation This will stop creators from being able to add new instances of this plugin, but won't remove previously added instances to reduce the chance of broken content. This will allow creators to make the decision themselves on how they want to manage the plugin - by deleting it from their content or using the last valid state they saw. # Example media source plugin Source: https://developers.kit.com/plugins/media-source/example-plugin Simple example media source plugin Example media source plugin # Media source overview Source: https://developers.kit.com/plugins/media-source/overview Introducing media source plugins This functionality allows you to add your own images into Kit’s media gallery, letting creators search, filter and sort content from 3rd party sources right from the Kit email editor. To get started, first sign into our app and visit the [Build tab on Kit App Store](https://app.kit.com/apps?is=created) to create your App, configure your plugin access, and create your plugins. Each plugin will appear as an item under your company's name in our editor’s element menu as well as in the sidebar for the media gallery. For more details on setting up apps and plugins, visit our [app](/kit-app-store/building-apps) and [plugin](/plugins/managing-plugins) building guides. # Media source plugin configuration Source: https://developers.kit.com/plugins/media-source/plugin-configuration Setting up your media source plugins Kit's media source plugin lets you extend our email editor to allow creators to natively add images from external sources into their content. This guide walks you through configuring your plugin's appearance, behavior, and settings—from naming and visual presentation to backend functionality and user controls. ## Name The plugin `name` is the user-facing name for your block and will be shown in the content block menu and in the media gallery itself. In the example above, the plugin `name` is “Your plugin name”. Your name should be short, ideally one or two words. ## Description The `description` is a short phrase describing your media source. It will appear underneath the name in the content block menu. In the example above this is set to “Short description for the plugin”. ## Sort order If you have multiple media sources within the same app, the `sort order` determines their placement within both the media gallery and the content block menu. In the images above, “Your plugin name” has a `sort order` of 0, while “Your plugin name 2” has a `sort order` of 1. ## Logo The `logo` is an image for the element to be displayed alongside the `name` and the `description`. Only PNG, GIF, JPEG extensions are supported. The recommended size is 150x120px. ## Request URL The `request URL` is the URL of an endpoint on your server that returns the list of images, complete with all the necessary properties to render the images in the gallery and place them within the email content for use by the creator. You’ll generate this response based on the settings you’ve defined for your media source (outlined in the next section). Once a user completes all required settings, we’ll make a POST request to your `request URL`. The request will contain a `settings` object with the user’s selected values for each of your search, filter, and sort settings, as well as pagination details, like so: ``` GET ? after=WzE0XQ==& settings[query]=Dogs& settings[label]=My Media& settings[sort]=updated_desc ``` A cursor for paginating forwards through the media items. A cursor for paginating backwards through the media items. A number to limit the amount of media items returned in the payload. A setting value entered. The name will be set to the name configured for the plugin setting. Response Schema: *application/json* Pagination information for the payload Whether there is a previous page of media items to cycle back to. Whether there is a next page of media items to cycle through. A cursor identifying the first record of the returned media items that can be used with the `before` query param to fetch the previous page's items. If there is no previous page (on the first page) this should be null. A cursor identifying the last record of the returned media items that can be used with the `after` query param to fetch the next page's items. If there is no next page (on the last page) this should be null. At most how many records were limited to the payload. The list of media items for the page A unique identifier for the media. The type of media - only `image` is only supported at this moment. A link to the media item A link to the media item's thumbnail A textual description of the media item The default caption to be used to describe the media item. The creator will be able to overwrite this when selecting the media. A label for the creator to identify the media item. This is only shown to the creator for organizing their media items. Whether the media should always be directly used and embedded via the href. Setting to `true` will prevent the image from being reuploaded on Kit's servers. A URL to an endpoint that accepts can accept a POST request for notifying that the media was downloaded. Information about the media creator for attribution. A short label to use when the media is displayed to attribute the original creator A link to the original creator. ```json 200 response theme={null} { "pagination": { "has_previous_page": false, "has_next_page": true, "start_cursor": "WzEzXQ==", "end_cursor": "WzE0XQ==", "per_page": 100 }, "data": [ { "id": "example1", "type": "image", "url": "https://picsum.photos/600/900", "thumbnail_url": "https://picsum.photos/200/400", "alt": "Lorem ipsum odor amet, consectetuer adipiscing elit." }, { "id": "example2", "type": "image", "url": "https://picsum.photos/500/800", "thumbnail_url": "https://picsum.photos/200/400", "alt": "Sed do eiusmod tempor incididunt ut labore et dolore magna aliqua." } ] } ``` ```json 200 response with additional properties theme={null} { "pagination": { "has_previous_page": false, "has_next_page": true, "start_cursor": "WzEzXQ==", "end_cursor": "WzE0XQ==", "per_page": 100 }, "data": [ { "id": "example1", "type": "image", "url": "https://picsum.photos/600/900", "thumbnail_url": "https://picsum.photos/600/900", "alt": "Lorem ipsum odor amet, consectetuer adipiscing elit.", "caption": "Lorem ipsum odor amet", "title": "example.png", "notify_download_url": "https://media-gallery-plugin.com/media/0/downloaded", "hotlink": true, "attribution": { "label": "Johnny Appleseed", "href": "https://example.com/johnny_appleseed?utm_source=your_app_name&utm_medium=referral" } } ] } ``` *Note* - your app should also handle the empty case, ensuring you show some media by default when the creator opens up your plugin without interacting with any of the configuration elements your app offers. If you've encountered an error, return an object containing an errors array of strings. You may add as many errors to this array as you’d like. ```json theme={null} { "data": [], "errors": ["Plan not found"] } ``` ## Settings JSON The media gallery supports three optional groups that settings can be placed in: `search_group`, `filter_group`, & `sort_group`. Each group currently accepts a single setting that can be used by creators to filter and sort your content for ease of use. Configuration with a search, filter and sort component could look like so: ```json Example JSON [expandable] theme={null} [ { "type": "group", "name": "search_group", "label": "search", "settings": [ { "type": "text", "name": "search", "label": "Search", "help": "Search Giphy", "required": false } ] }, { "type": "group", "name": "filter_group", "label": "filter", "settings": [ { "type": "select", "label": "Rating", "name": "rating", "options": [ { "label": "G", "value": "g" }, { "label": "PG", "value": "pg" }, { "label": "PG-13", "value": "pg-13" } ], "required": false } ] }, { "type": "group", "name": "sort_group", "label": "sort", "settings": [ { "type": "select", "name": "sort", "label": "Sort", "options": [ { "label": "Alphabetical (A-Z)", "value": "alphabetical_asc" }, { "label": "Alphabetical (Z-A)", "value": "alphabetical_desc" } ] } ] } ] ``` Details on the individual configuration options can be found on the [plugin settings page](/plugins/media-source/plugin-settings). # Media source plugin flow Source: https://developers.kit.com/plugins/media-source/plugin-flow Example flow for the media source plugin Let’s say you were developing an integration that allowed users to embed design files from your app natively within the Kit editor. The full flow would look like this: Create a POST endpoint on your server to generate the JSON to render your media in the media gallery (see [request URL](/plugins/media-source/plugin-configuration#request-url) for more details) *Optionally* * If using a dynamic filter (see [dynamic select input](/plugins/media-source/plugin-settings#filter) for more details), create a POST endpoint on your server to return the elements for the filter select menu * If you require notification for image insertion (see [request URL](/plugins/media-source/plugin-configuration#request-url)for more details), create a POST endpoint on your server that we will call when an image has been placed into an email You [create your app within Kit](https://app.kit.com/apps?is=created) and configure the designs plugin using [the guide found here](/plugins/media-source/plugin-configuration). Once your app and plugin are ready, you submit your app for approval and publish. A Kit user installs your app, triggering your plugin's OAuth authentication flow. The Kit user navigates to an email and searches for your designs plugin by: * Using the / command to search for the name of your plugin or app, to filter the content menu * Pressing the + button and scrolling down to your plugin, found under your app's heading * Using either method above to select *image* from the menu and navigating to the designs plugin found in the media gallery sidebar Upon opening your plugin in the media gallery, our system makes an initial request to the endpoint in #1 for the default list of images we should show from your server. If your settings include a dynamic select, we will also make a request to the endpoint in step 2 to render the select elements in the filter dropdown Any time the creator interacts with and fills out all required settings, our system makes a request to your endpoint from #1 with the values You will return the JSON for the media source, which we'll use to render the images in the media gallery for selection A creator scrolls through the list, triggering additional pagination requests from Kit A creator selects an image, whereby Kit inserts the image into the email content - if you have set up image insertion notifications from step 2, we will also notify you at this point # Media source plugin recommendations Source: https://developers.kit.com/plugins/media-source/plugin-recommendations Best practices, tips and tricks to get the most out of media source plugins * For the best creator experience, ensure the resolution for the thumbnail is sufficient to best showcase the full image within the media gallery - this may mean using the full image asset rather than a traditional thumbnail * Alt text is important to ensure accessibility for all creators, regardless of how they use our service, making sure this is clear is integral for a high quality plugin * We recommend to only use hotlinks where absolutely necessary - such as if your image URL expires, or your platform prohibits the use of a copy of the image - to ensure the asset is always available for use # Media source plugin settings Source: https://developers.kit.com/plugins/media-source/plugin-settings Media gallery settings components This guide explains all of the media gallery settings components that are available to be used in your plugin's [settings JSON](/plugins/media-source/plugin-configuration#settings-json) configuration, giving your app users the ability to find the media they want to add into their email content. ## Compatible settings components * [Dynamic select input](/plugins/component-library/dynamic-select-input) * [Select input](/plugins/component-library/select-input) * [Text input](/plugins/component-library/text-input) Components for media source plugins work slightly differently than other plugin types. Check below to see how to utilize our preset `search`, `filter` and `sort` functionality, powered by `groups`: ### Search The optional search functionality utilizes a [text input component](/plugins/component-library/text-input), housed in a media source specific `group` called `search_group` - offering a way for creators to filter your images through a text filter. ```json theme={null} { "type": "group", "name": "search_group", "settings": [ { "type": "text", "name": "search", "label": "Search", "help": "Search Giphy", "required": false } ] } ``` It is good practice to make this as smart as possible - ensuring that you return the elements that make sense with the text inputted by the user. This means matching against the name of the image, but also any other relevant metadata a creator may be filtering by (e.g. you may want to include the name of the Folder within the search logic). Upon keystroke, a new POST request will be made to the `request URL` specified, with the text inputted, for your app to return a newly sorted version of results. ### Filter The optional filter functionality allows plugins to offer a flat, single-select dropdown the creator can select from to help them find the content they are looking for. This can be predefined through use of the [select input component](/plugins/component-library/select-input) or programmatically generated as the plugin loads, through use of the [dynamic select input component](/plugins/component-library/dynamic-select-input). Regardless of whether your plugin utilizes a [select input component](/plugins/component-library/select-input) or a [dynamic select input component](/plugins/component-library/dynamic-select-input), this will also need be housed in a media source specific `group`, named `filter_group`. Examples for each can be found below: ```json Select input theme={null} { "type": "group", "name": "filter_group", "settings": [ { "type": "select", "label": "Rating", "name": "rating", "options": [ { "label": "G", "value": "g" }, { "label": "PG", "value": "pg" }, { "label": "PG-13", "value": "pg-13" }, { "label": "R", "value": "r" } ], "required": false } ] } ``` ```json Dynamic select input theme={null} { "type": "group", "name": "filter_group", "settings": [ { "type": "dynamicSelect", "label": "Folders", "name": "folder", "request_url": "https://example-plugin.com/folders", "required": false } ] } ``` ### Sort The optional sort functionality utilizes a [select input component](/plugins/component-library/select-input) to offer a flat list of sort options the creator can select from, each with a `label` and `value` nested in an `options` array. Once an `option` is selected, a new POST request will be made to the *Request URL* specified, with the value selected, for your app to return a newly sorted version of results. This will need to be encased by a media source specific `group` named `sort_group`. ```json theme={null} { "type": "group", "name": "sort_group", "settings": [ { "type": "select", "name": "sort", "label": "Sort", "options": [ { "label": "Alphabetical (A-Z)", "value": "alphabetical_asc" }, { "label": "Alphabetical (Z-A)", "value": "alphabetical_desc" } ] } ] } ``` # OAuth authorization Source: https://developers.kit.com/plugins/oauth-authorization Setting up OAuth authorization for your plugins The following guide helps guide you through the endpoints required for plugin authorization. For more details on setting up app authorization flows as a whole, check out our [app authentication guide here.](/kit-app-store/authentication) ## Plugin OAuth server setup For OAuth, you'll need to support 4 endpoints: * Getting an authorization code grant * Requesting an access token using an authorization code * Requesting an access token using a refresh token * Revoking an access token The endpoints must accept the requests outlined below and return responses minimally matching the outlined response shapes (additional attributes can be returned but we require at least what appears in these docs). The redirect URI we'll use for all of our requests will be [https://app.kit.com/apps/install](https://app.kit.com/apps/install). We'll use Bearer Authorization to include the user's access token on all the requests we make to your endpoints. A diagram for this flow for apps that only require Plugin OAuth authentication can be found below. For guidance on apps that also require API authentication, also check out the [app authentication guide here.](/kit-app-store/authentication). OAuth app flow ### Get an authorization code grant We will start the OAuth process by making a GET request to your provided authorization URL: ``` GET ? client_id=& response_type=code& redirect_uri=https://app.kit.com/apps/install ``` Your plugin's configured Client ID `code` `https://app.kit.com/apps` Custom state to pass to the redirect\_uri and/or to protect from XSRF ```shell shell theme={null} curl -G GET \ -H 'Accept: text/html' -d "client_id=" -d "response_type=code" -d "redirect_uri=https://app.kit.com/apps/install" ``` ```javascript Javascript theme={null} const headers = { 'Accept':'text/html' }; fetch('?client_id=&response_type=code&redirect_uri=https://app.kit.com/apps/install', { method: 'GET', headers: headers }) .then(function(res) { return res.json(); }).then(function(body) { console.log(body); }); ``` ```ruby Ruby theme={null} require 'rest-client' require 'json' headers = { 'Accept' => 'text/html' } result = RestClient.get '?client_id=&response_type=code&redirect_uri=https://app.kit.com/apps/install', params: { }, headers: headers p JSON.parse(result) ``` ```python Python theme={null} import requests headers = { 'Accept': 'text/html' } r = requests.get('?client_id=&response_type=code&redirect_uri=https://app.kit.com/apps/install', headers = headers) print(r.json()) ``` **302:** Redirects to `https://app.kit.com/apps` with authorization code parameter ### Get a new token using an authorization code We will then exchange the returned authorization code for a new access token by making a POST to your configured token URL, with a body like so: ```json theme={null} { "client_id": "", "client_secret": "", "grant_type": "authorization_code", "code": "abc123", "redirect_uri": "https://app.kit.com/apps" } ``` Response schema: *application/json* Your plugin's configured Client ID Your plugin's configured Client Secret `authorization_code` The code received via the redirect uri query params `https://app.kit.com/apps` ```shell shell theme={null} curl -X POST \ -H 'Content-Type: application/x-www-form-urlencoded' \ -H 'Accept: application/json' \ -d '{ "client_id": "", "client_secret": "", "grant_type": "authorization_code", "code": "abc123", "redirect_uri": "https://app.kit.com/apps" } ``` ```javascript Javascript theme={null} const inputBody = '{ "client_id": "", "client_secret": "", "grant_type": "authorization_code", "code": "abc123", "redirect_uri": "https://app.kit.com/apps" }'; const headers = { 'Content-Type':'application/x-www-form-urlencoded', 'Accept':'application/json' }; fetch('', { method: 'POST', body: inputBody, headers: headers }) .then(function(res) { return res.json(); }).then(function(body) { console.log(body); }); ``` ```ruby Ruby theme={null} require 'rest-client' require 'json' headers = { 'Content-Type' => 'application/x-www-form-urlencoded', 'Accept' => 'application/json' } payload = { "client_id" => "", "client_secret" => "", "grant_type" => "authorization_code", "code" => "abc123", "redirect_uri" => "https://app.kit.com/apps" } result = RestClient.post '', payload, params: { }, headers: headers p JSON.parse(result) ``` ```python Python theme={null} import requests headers = { 'Content-Type': 'application/x-www-form-urlencoded', 'Accept': 'application/json' } json = { "client_id": "", "client_secret": "", "grant_type": "authorization_code", "code": "abc123", "redirect_uri": "https://app.kit.com/apps" } r = requests.post('', headers = headers, json = json) print(r.json()) ```

**200:** Returns a token

```json theme={null} { "access_token": "YOUR_ACCESS_TOKEN_HERE", "expires_in": 172800, "refresh_token": "YOUR_REFRESH_TOKEN_HERE", "created_at": 1710270147 } ```

Response schema: *application/json*

Access token for a user in the plugin app's system When the access token expire in seconds Refresh token that can be used to generate a new access token once this one expires When the access token was created
### Get a new token using a refresh token When the previous access token expires, we will request a new access token by making a POST to your configured refresh token URL, with a body like so: ```json theme={null} { "client_id": "", "grant_type": "refresh_token", "refresh_token": "string" } ``` Response body schema: *application/json* Your plugin's configured Client ID `refresh_token` `Refresh token` ```shell shell theme={null} curl -X POST \ -H 'Content-Type: application/x-www-form-urlencoded' \ -H 'Accept: application/json' \ -d '{ "client_id": "", "grant_type": "refresh_token", "refresh_token": "abc123" }' ``` ```javascript Javascript theme={null} const inputBody = '{ "client_id": "", "grant_type": "refresh_token", "refresh_token": "string" }'; const headers = { 'Content-Type':'application/x-www-form-urlencoded', 'Accept':'application/json' }; fetch('', { method: 'POST', body: inputBody, headers: headers }) .then(function(res) { return res.json(); }).then(function(body) { console.log(body); }); ``` ```ruby Ruby theme={null} require 'rest-client' require 'json' headers = { 'Content-Type' => 'application/x-www-form-urlencoded', 'Accept' => 'application/json' } payload = { "client_id" => "", "grant_type" => "refresh_token", "refresh_token" => "abc123" } result = RestClient.post '', payload, params: { }, headers: headers p JSON.parse(result) ``` ```python Python theme={null} import requests headers = { 'Content-Type': 'application/x-www-form-urlencoded', 'Accept': 'application/json' } json = { "client_id": "", "grant_type": "refresh_token", "refresh_token": "abc123" } r = requests.post('', headers = headers, json = json) print(r.json()) ```

**200:** Returns a token

```json theme={null} { "access_token": "YOUR_NEW_ACCESS_TOKEN_HERE", "expires_in": 7200, "refresh_token": "YOUR_NEW_REFRESH_TOKEN_HERE", "created_at": 1710271006 } ```

Response schema: *application/json*

Access token for a user in the plugin app's system When the access token expire in seconds Refresh token that can be used to generate a new access token once this one expires When the access token was created
### Revoke an access token When your app is uninstalled by a creator, we will make a POST request to your revoke token URL, with a body like so: ```json theme={null} { "client_id": "", "client_secret": "", "token": "abc123" } ``` Response body schema: *application/json* Your plugin's configured Client ID Your plugin's configured Client Secret The access token ```shell shell theme={null} curl -X POST \ -H 'Content-Type: application/x-www-form-urlencoded' \ -H 'Accept: application/json' \ -d '{ "client_id": "", "client_secret": "", "token": "abc123" }' ``` ```javascript Javascript theme={null} const inputBody = '{ "client_id": "", "client_secret": "", "token": "string" }'; const headers = { 'Content-Type':'application/x-www-form-urlencoded', 'Accept':'application/json' }; fetch('', { method: 'POST', body: inputBody, headers: headers }) .then(function(res) { return res.json(); }).then(function(body) { console.log(body); }); ``` ```ruby Ruby theme={null} require 'rest-client' require 'json' headers = { 'Content-Type' => 'application/x-www-form-urlencoded', 'Accept' => 'application/json' } payload = { "client_id" => "", "client_secret" => "", "token" => "abc123" } result = RestClient.post '', payload, params: { }, headers: headers p JSON.parse(result) ``` ```python Python theme={null} import requests headers = { 'Content-Type': 'application/x-www-form-urlencoded', 'Accept': 'application/json' } json = { "client_id": "", "client_secret": "", "token": "abc123", } r = requests.post('', headers = headers, json = json) print(r.json()) ``` **200:** OK ## App configuration for OAuth To set OAuth up for your app, go to the "Authentication" tab on your app, toggle on the "Plugin" section and select "OAuth" from the "Authorization method" dropdown: plugin authentication strategies This will expand the section and offer the fields to add your: * Authorization URL * Token URL * Refresh token URL * Revoke URL as well as the "Client ID" and "Client secret" fields for us to authenticate with your service: OAuth authorization strategy UI 
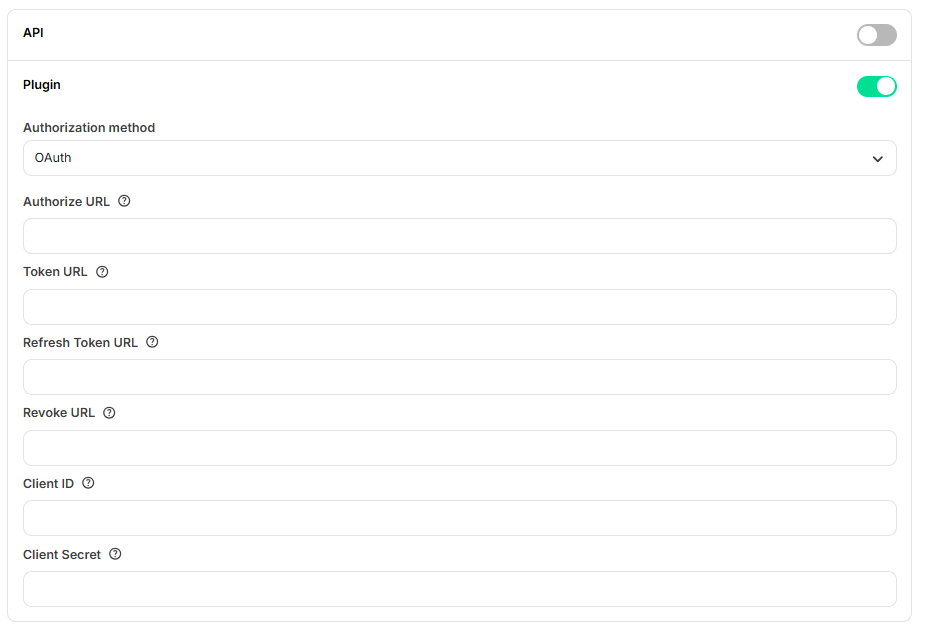
Once all of the fields are filled out, click save and OAuth will be set up for all plugins you create for the app. ### Post-installation redirect Your app may also include the option to alternatively send creators to your app, or an externally hosted onboarding flow, post signup. This can be configured using the `Redirect URL after install` field in your [app details setting page](/kit-app-store/app-details-page). An example of this flow can be seen below. example redirect flow example redirect flow ### Plugin scopes When configuring OAuth for your plugins, you're able to define scopes that specify which permissions your app requires from the creator's account. These scopes are managed in the plugin settings page and play a crucial role in app versioning and authentication. ##### Configuring Scopes In the plugin settings page, you can define the scopes your plugin requires. Kit tracks these scopes cumulatively across all plugins in your app, which means: * Each plugin can declare its own required scopes * The total scopes for your app are the combined unique scopes from all active plugins * Changes to cumulative scopes trigger app versioning ##### Scope Format Requirements When defining scopes, follow these critical formatting rules: * **Never include spaces in scope names** - Use underscores, hyphens, camel/snake case or colons instead * ❌ Incorrect: `"read data"`, `"write data"` * ✅ Correct: `"read:data"`, `"write:data"`, `"read_data"` * Spaces cause serialization errors when scopes are processed as arrays or comma-separated strings * Use consistent naming conventions across all your plugins (recommended format: `action:resource`) ##### When Scopes Trigger Re-authentication Creators will be prompted to re-authenticate when: * You add a new scope to any plugin that wasn't previously used by other plugins * You create a new plugin with scopes not used by existing plugins * The authorization strategy changes (for example, from "No authorization" to "OAuth") Removing scopes does not require re-authentication, making it safe to reduce permissions without disrupting users. ##### Testing Scope Changes When developing and testing scope changes: * Plugins in test mode (created and have never been activated) require you to re-authenticate the app in your developer account when new scopes are added * This allows you to verify the authentication flow before affecting production users * Always test the complete OAuth flow with new scopes before publishing ##### Example If your app has two plugins with the following scopes: * **Product Gallery Plugin**: `read:products`, `read:inventory` * **Customer Reviews Plugin**: `read:products`, `read:reviews` Your app's cumulative scopes are: `read:products`, `read:inventory`, `read:reviews` Adding `write:products` to either plugin would trigger a new app version and require re-authentication, while adding `read:products` to a new third plugin would not. For comprehensive information about app versioning and its implications for both creators and developers, see the [App Versioning Guide](/kit-app-store/app-versioning). # Plugin overview Source: https://developers.kit.com/plugins/overview Kit plugins integrate seamlessly with our creators' workflows, giving them instant access to third-party content and creative assets directly from within the Kit UI. Unlike basic integrations creators have to manually stitch together, plugins become part of their Kit experience—transforming their email platform into a personalized hub that streamlines their creative business, powered by the apps and plugins you create. Unlike API based apps, plugins that connect to third-party tools authenticate the other way around, with Kit needing to authenticate against your third-party service to be able to pull the data required to be rendered within Kit. More details on setting up authentication can be found in our [plugin OAuth guide](/plugins/oauth-authorization). ## Plugin types We currently offer three plugin types: * [Content blocks](/plugins/content-blocks/overview) * [Media source](/plugins/media-source/overview) * [Automation nodes](/plugins/automation-nodes/overview) ### Content blocks Content blocks let you create dynamic HTML elements for creators to directly insert into your emails. Help creators promote their upcoming events, sell their latest product, or showcase their latest podcast episode—all without leaving the Kit editor. These blocks make creators' emails more engaging while saving them valuable creative time from going back-and-forth between tools. ### Media sources Media sources let creators connect to and filter external media galleries right from the Kit media gallery—bringing their content to where they need it, when they need it. This offers simple filtration and search functionality, helping you get creators to the content they want, as quickly as possible. ### Automation nodes Automation nodes let you extend Kit's visual automation tools with custom functionality, enabling creators to build powerful, automated workflows that connect your app with their subscriber journeys. Create Event nodes that trigger automations when specific conditions are met in your platform, or Action nodes that automatically perform tasks in your app when subscribers reach them in a funnel. These nodes help creators save time by automating repetitive tasks and create sophisticated subscriber experiences that span multiple tools – all within Kit's intuitive Visual Automation builder. # Welcome Source: https://developers.kit.com/welcome

Integrate and automate with Kit

Build apps for the Kit App Store or use Kit's API to automate custom workflows

Learn everything you need to know to build for the Kit App Store. Automate and access Kit programmatically via our API. Extend the creator Kit experience further, with native plugin functionality.
Connect AI coding agents directly to Kit's developer docs using the Model Context Protocol. Ask questions, get support, and connect with other developers. Stay up to date with the latest changes to Kit's developer platform.
# List email templates Source: https://developers.kit.com/api-reference/email-templates/list-email-templates api-reference/v4.json get /v4/email_templates # Create a purchase Source: https://developers.kit.com/api-reference/purchases/create-a-purchase api-reference/v4.json post /v4/purchases # Get a purchase Source: https://developers.kit.com/api-reference/purchases/get-a-purchase api-reference/v4.json get /v4/purchases/{id} # List purchases Source: https://developers.kit.com/api-reference/purchases/list-purchases api-reference/v4.json get /v4/purchases # List segments Source: https://developers.kit.com/api-reference/segments/list-segments api-reference/v4.json get /v4/segments # Add subscriber to sequence Source: https://developers.kit.com/api-reference/sequences/add-subscriber-to-sequence api-reference/v4.json post /v4/sequences/{sequence_id}/subscribers/{id} The subscriber being added to the sequence must already exist. Subscribers can be created using the "[Create a subscriber](#create-a-subscriber)" endpoint. # Add subscriber to sequence by email address Source: https://developers.kit.com/api-reference/sequences/add-subscriber-to-sequence-by-email-address api-reference/v4.json post /v4/sequences/{sequence_id}/subscribers The subscriber being added to the sequence must already exist. Subscribers can be created using the "[Create a subscriber](#create-a-subscriber)" endpoint. # List sequences Source: https://developers.kit.com/api-reference/sequences/list-sequences api-reference/v4.json get /v4/sequences # List subscribers for a sequence Source: https://developers.kit.com/api-reference/sequences/list-subscribers-for-a-sequence api-reference/v4.json get /v4/sequences/{sequence_id}/subscribers # Remove tag from subscriber Source: https://developers.kit.com/api-reference/tags/remove-tag-from-subscriber api-reference/v4.json delete /v4/tags/{tag_id}/subscribers/{id} # Create a webhook Source: https://developers.kit.com/api-reference/webhooks/create-a-webhook api-reference/v4.json post /v4/webhooks Available event types:
- `subscriber.subscriber_activate`
- `subscriber.subscriber_unsubscribe`
- `subscriber.subscriber_bounce`
- `subscriber.subscriber_complain`
- `subscriber.form_subscribe`, required parameter `form_id` [Integer]
- `subscriber.course_subscribe`, required parameter `sequence_id` [Integer]
- `subscriber.course_complete`, required parameter `sequence_id` [Integer]
- `subscriber.link_click`, required parameter `initiator_value` [String] as a link URL
- `subscriber.product_purchase`, required parameter `product_id` [Integer]
- `subscriber.tag_add`, required parameter `tag_id` [Integer]
- `subscriber.tag_remove`, required parameter `tag_id` [Integer]
- `purchase.purchase_create`
- `custom_field.field_created`
- `custom_field.field_deleted`
- `custom_field.field_value_updated`, required parameter `custom_field_id` [Integer] # Delete a webhook Source: https://developers.kit.com/api-reference/webhooks/delete-a-webhook api-reference/v4.json delete /v4/webhooks/{id} # List webhooks Source: https://developers.kit.com/api-reference/webhooks/list-webhooks api-reference/v4.json get /v4/webhooks Webhooks are automations that will receive subscriber data when a subscriber event is triggered, such as when a subscriber completes a sequence.

When a webhook is triggered, a `POST` request will be made to your URL with a JSON payload. # Changelog Source: https://developers.kit.com/changelog Developer platform updates and new features. ## 🚀 Kit Developer Docs MCP server Connect your AI coding agent directly to Kit's developer documentation using the [Kit Developer Docs MCP server](https://developers.kit.com/mcp/kit-developer-docs-mcp). Supported clients can query the full API reference on demand, make live API calls on your behalf, and spin up local OAuth servers for testing. ## 🚀 Custom Field Webhooks & Bulk Updates * Introduced 3 new webhook events for custom fields: `custom_field.field_created`, `custom_field.field_deleted`, and `custom_field.field_value_updated`, enabling real-time sync with third-party apps. * Added a bulk update endpoint (`POST /v4/bulk/custom_fields/subscribers`) to update multiple custom field values for multiple subscribers in a single API call. * [Learn more about webhooks](https://developers.kit.com/api-reference/webhooks/create-a-webhook) and [bulk updates](https://developers.kit.com/api-reference/custom-fields/bulk-update-subscriber-custom-field-values). ## 🚀 Transparent color option now available in color picker The [color picker component](https://developers.kit.com/plugins/component-library/color-picker) now supports an `allow_transparent` property that displays a "Transparent" toggle, allowing creators to set colors to transparent. ## 🚀 App Settings now live in Kit App Store Developers can now set an external "App Settings" URL in their app settings, allowing Creators to be able to customize their app setup post-installation, reducing account bloat by controlling data creation and sync. Read about best practices of how to implement this [here](https://developers.kit.com/kit-app-store/app-details-page#how-to-configure). ## 🔧 Improved Kit App Store Sorting * Default sorting now highlights the most popular apps by all-time installations. * Introduced a "Trending" category for apps gaining traction across our creators. * Renamed "Last added" to "Newest" for clarity. ## 🚀 New API endpoints: "List stats for a subscriber" and "Filter subscribers based on engagement" Developers can now use Kit's API to filter subscribers by events like `opened`, `clicked`, `sent`, `delivered`, and `subscribed` with customizable date ranges and event counts. [Explore the API](https://developers.kit.com/api-reference/subscribers/filter-subscribers-based-on-engagement) to enhance subscriber engagement tracking. Additionally, the `List stats` endpoint now supports specifying date ranges for subscriber engagement data. [Learn more](https://developers.kit.com/api-reference/subscribers/list-stats-for-a-subscriber). ## 🚀 Automation nodes app plugin environment launched Developers can now integrate third-party apps with [Kit Visual Automations](https://kit.com/features/automations) using action and event nodes. This opens up powerful new ways for developers to build with Kit, and for creators to automate their workflows. * [Event nodes](https://developers.kit.com/plugins/automation-nodes/plugin-flow#event-node) trigger automations on conditions like "call booked" or "survey completed". * [Action nodes](https://developers.kit.com/plugins/automation-nodes/plugin-flow#action-node) perform tasks in external systems such as "send an SMS" or "enroll a subscriber in a course". * Apps like [Shopify](https://app.kit.com/apps/330), [Thinkific](https://app.kit.com/apps/1451), and [Calendly](https://app.kit.com/apps/2063) are already utilizing these nodes. Explore more in our [documentation](https://developers.kit.com/plugins/automation-nodes/overview). ## 🚀 Dynamic return URLs for app installations Developers can now redirect users back to specific pages after completing an app install using the `return_to` query parameter in [installation flows](https://developers.kit.com/kit-app-store/authentication#externally-initiating-installations), enabling smoother integration experiences that originate from partner sites. ## 📖 Developer changelog now live Developer changelog interface Stay up to date with Kit's latest developer platform updates through our new changelog featuring: * **Emoji categories**: 🚀 Added, 🔧 Changed, 🐛 Fixed, ⚠️ Breaking Changes * **RSS subscription**: Never miss an update with the RSS feed button * **Smart filtering**: Filter by product area including Kit App Store, Plugins, API, Authentication, and more * **Copy functionality**: Easily share updates with the copy page feature [Subscribe to updates](https://developers.kit.com/changelog/rss.xml) to stay informed about the latest changes. ## 🚀 New subscriber stats endpoint available Get comprehensive engagement metrics for individual subscribers including sends, opens, clicks, bounce rates, and timestamps via the new [subscriber stats API endpoint](https://developers.kit.com/api-reference/subscribers/list-stats-for-a-subscriber). ## 🚀 New plugin components and dependency support now available * New plugin components: [Radio Group](https://developers.kit.com/plugins/component-library/radio-group), [Slider](https://developers.kit.com/plugins/component-library/slider), [Textarea](https://developers.kit.com/plugins/component-library/textarea), [Toggle](https://developers.kit.com/plugins/component-library/toggle), [Numerical Input](https://developers.kit.com/plugins/component-library/numerical-input) * New plugin capabilities: [Group](https://developers.kit.com/plugins/component-library/group), [Dependencies](https://developers.kit.com/plugins/component-library/dependencies) * Plugin enhancements: Transparency and weights in [Font Picker](https://developers.kit.com/plugins/component-library/font-picker), a11y improvements across all components ## 🔧 Kit App Store and app management UX improvements * [Entire app cards](https://app.kit.com/apps) now clickable with streamlined navigation and consistent button hierarchy * New install button directly on [Build tab](https://app.kit.com/apps?is=created) for faster app testing workflows * In app settings (`https://app.kit.com/apps/:app_id/auth`), API and Plugin Authentication separated into distinct sections with clearer plugin type display ## 🚀 App Versioning now available for seamless authentication updates Developers can now ensure creators have access to their latest functionality through [app versioning](https://developers.kit.com/kit-app-store/app-versioning): * Apps automatically create new versions when authentication requirements change * Creators receive smart notifications and can update permissions without reinstalling * Plugin-level scope control with cumulative permission tracking across all plugins ## 🔧 OAuth flow now starts from api.kit.com Kit's OAuth flow [is now initiated](https://developers.kit.com/api-reference/authentication) from `api.kit.com/v4/oauth` for consistency with other API endpoints, replacing the previous `app.kit.com` requirement. ## 🚀 Direct app installation URLs now available Developers can now [drive app installations directly from their websites](https://developers.kit.com/kit-app-store/authentication#externally-initiating-installations) using `https://app.kit.com/apps/:app_id/install?k_app_id=k_:app_id` without requiring users to first visit Kit App Store. ## 🔧 App icons now display consistently across the Kit App Store App thumbnails now display as uniform squares (60x60px on detail pages, 40x40px elsewhere) with proper cropping and centering, ensuring professional appearance regardless of original image dimensions. ## 🚀 Plugin deletion now available for developers Developers can now permanently [delete plugins from their Kit apps](https://developers.kit.com/plugins/managing-plugins#deleting-plugins) to better manage their plugin inventory. ## 🚀 Brand new developer documentation platform We've completely rebuilt our developer documentation from the ground up, centralizing all developer resources in one comprehensive hub at [developers.kit.com](https://developers.kit.com). ### Key improvements include: * **Unified resource center**: All guides, tutorials, and API documentation now live in one carefully structured location * **Updated content**: Every piece of documentation has been refreshed and expanded, from app creation guides to OAuth implementation tutorials * **Enhanced navigation**: Improved site structure makes finding relevant information faster and more intuitive ## 🚀 New interactive features ### API Sandbox * Test Kit's V4 API directly in the documentation * Input your API key and make live requests without leaving the docs * Perfect for rapid prototyping and testing ### Advanced Search & AI Support * Full-text search across all documentation * Built-in "Ask AI" functionality for instant answers * Industry-standard llms.txt and llms-full.txt support for AI integrations ## 🔧 Developer experience improvements * **Dark mode support**: Documentation now adapts to your preferred viewing mode * **SEO optimized**: Better discoverability for developers searching for Kit integration help * **Quick action CTAs**: Streamlined paths to sign up, join the developer community, and contact support * **Mobile responsive**: Optimized experience across all devices